

Rotation lets you distribute form submissions between several recipients instead of sending every submission to everyone.
If a template has three possible recipients, the plugin sends the first submission to one recipient, the next submission to the next recipient, and continues through the list in sequence.
This is useful for workflows such as:
- lead assignment;
- support tickets;
- staff task distribution;
- service requests;
- application reviews;
- any form where one person should take ownership of each submission.
Before you start #
Open WordPress Admin → Nelx JFB Email Templates → Form Templates, then open the template you want to configure.
Set up the recipient pool first. Rotation works with the recipients resolved from the template, including:
- Standard (Email addresses);
- User ID Fields;
- User Roles;
- CCT Item recipients.
If you are not sure which recipient type to use, read Recipients & Delivery Options first.
Enable Rotation #
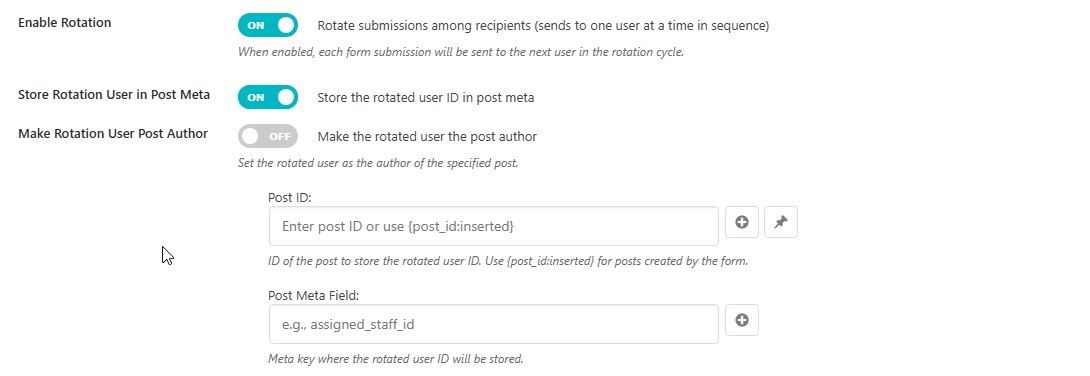
Find Enable Rotation and turn it on.
The setting is described in the template as:
Rotate submissions among recipients (sends to one user at a time in sequence)
Once Rotation is enabled, the plugin selects one recipient from the available recipient pool for each submission.
Example #
Suppose the recipient pool contains:
- Alice
- Brian
- Carol
The assignments will move through that pool in sequence:
| Submission | Recipient |
|---|---|
| 1 | Alice |
| 2 | Brian |
| 3 | Carol |
| 4 | Alice |
| 5 | Brian |
The plugin keeps track of the current position automatically. You do not need to create or manage a rotation group yourself.
If the recipient pool changes, the rotation cycle is reset for that pool so the new set of recipients starts cleanly.
Rotation changes how multiple recipients are handled #
Without Rotation, a template that resolves to several recipients sends one email with the additional recipients added as BCC.
With Rotation enabled, only the recipient selected for that submission receives the email.
This makes Rotation suitable for assignment workflows rather than broadcast emails.
Store the assigned user in post meta #
Turn on Store Rotation User in Post Meta when you want to save the WordPress user ID selected by the rotation cycle to a post.
This is useful when the email assignment should also become part of the post data. For example, a support ticket could store the assigned staff member in:
assigned_staff_id
After enabling the option, configure the following fields.
Post ID #
Enter the ID of the post where the assigned user should be stored.
If the JetFormBuilder form creates the post during submission, use:
{post_id:inserted}
You can insert this value using the Post Data button beside the field.
If the form is working with an existing post, you can provide the post ID directly or use a form field that contains it.
Post Meta Field #
Enter the meta key that should receive the selected user’s ID, for example:
assigned_staff_id
After a successful rotation, that field is updated with the WordPress user ID of the selected recipient.
Do not use both recipient-storage settings for the same assignment #
When Rotation is handling the assignment, use Store Rotation User in Post Meta.
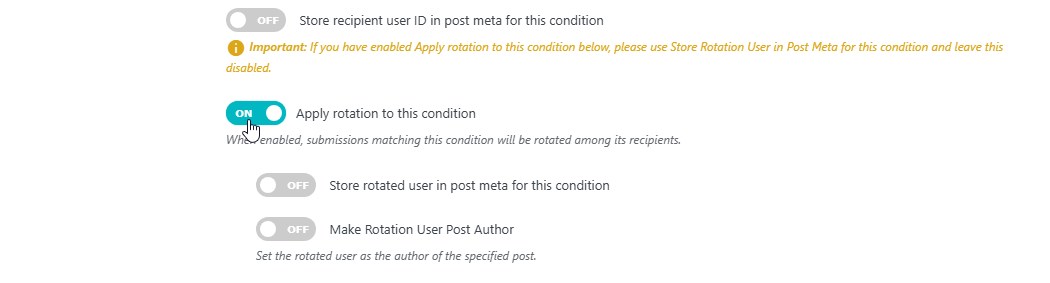
Leave Store Recipient User ID in Post Meta off for that same assignment. The latter is intended for normal recipient handling when Rotation is not selecting the user.
Make the rotated user the post author #
Rotation can also set the selected user as the WordPress author of a post.
Turn on Make Rotation User Post Author.
The plugin then uses the configured Post ID and changes that post’s author to the user selected by Rotation.
This is useful when post ownership itself should follow the assignment. For example, a newly created task or request can immediately become authored by the staff member who received it.
If the form creates a new post, use:
{post_id:inserted}
For this feature, the selected recipient should resolve to a WordPress user because a WordPress post author is stored as a user ID.
Store the assignment and change the author together #
You can enable both:
- Store Rotation User in Post Meta; and
- Make Rotation User Post Author.
They serve different purposes.
The first stores the selected user’s ID in a custom field. The second changes the WordPress post author.
For example, a task could use:
- Post Author → assigned staff member;
assigned_staff_id→ the same user’s ID for queries, filters, or reporting.
Rotation inside Conditional Recipients #
Rotation can also be enabled inside an individual recipient condition.
Open the condition and turn on Apply rotation to this condition.
When that condition matches, only the recipients configured inside that condition are used for its rotation pool.
This allows different conditions to maintain separate assignment sequences.
For example:
- High-priority support → rotate among senior support staff;
- Normal support → rotate among the general support team;
- Billing → send directly to finance without rotation.
Inside the condition you can also enable:
- Store rotated user in post meta for this condition;
- Make Rotation User Post Author.
The Post ID and post-meta settings work in the same way as the main template settings.
For the condition setup itself, see Conditional Recipients & Routing Rules.
Rotation with CCT Item recipients #
A CCT Item can also provide the recipient pool.
For example, the CCT item may contain several user IDs or email addresses. Rotation can select one resolved recipient for each submission.
If your recipients come from a JetEngine Custom Content Type, configure that recipient first using CCT Recipients & CCT Placeholders.
Rotation with Connect Relation #
If you use Connect Relation for a JetAppointments workflow, Rotation can determine which service provider is selected before the relationship is created.
When Rotation produces one recipient, only that selected provider is used for the relation workflow.
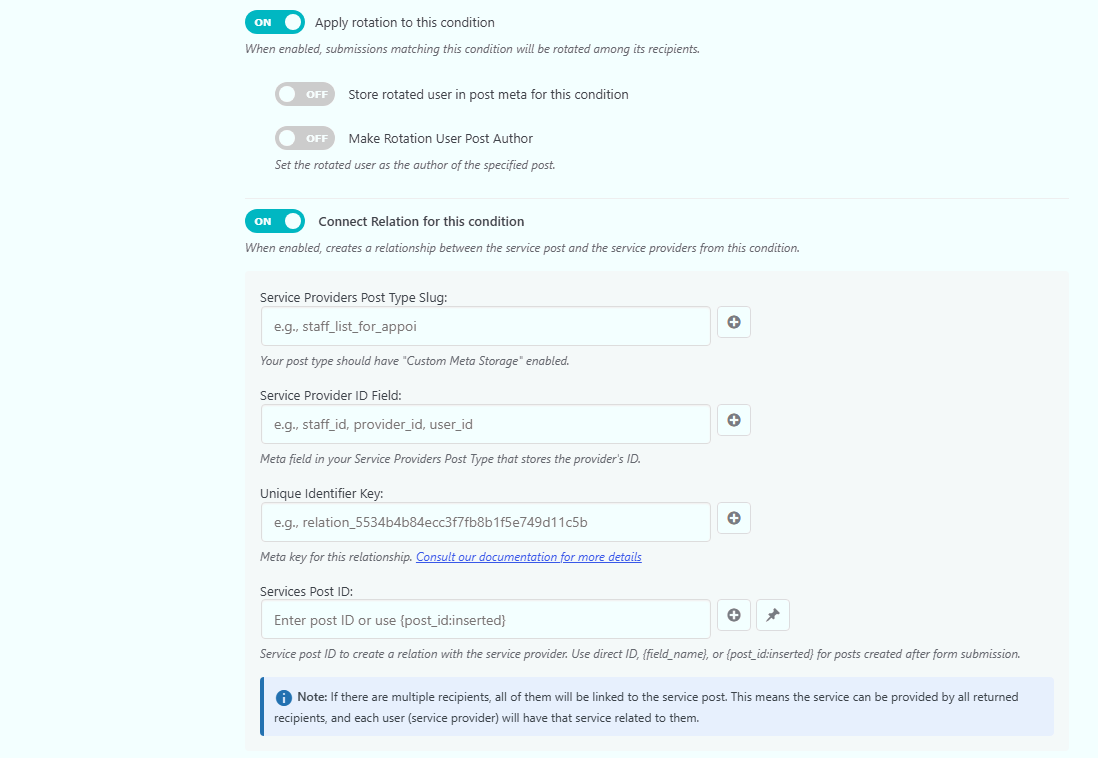
The relation setup is covered separately in Connect Relation for JetAppointments.
A practical assignment setup #
Suppose a lead form should assign each new lead to one sales user.
You could configure the template like this:
- Choose User Roles as the Recipient Type.
- Select the sales role.
- Turn on Enable Rotation.
- Turn on Store Rotation User in Post Meta.
- Set Post ID to
{post_id:inserted}. - Set Post Meta Field to
assigned_sales_user. - If the assigned salesperson should also own the post, enable Make Rotation User Post Author.
- Save the template and test several submissions.
Each submission goes to one user at a time, and the selected user can also be saved against the post.
If Rotation is not behaving as expected #
Check these points first:
- Make sure Enable Rotation is on.
- Confirm that the recipient type actually resolves to more than one valid recipient.
- If using User ID Fields, make sure the submitted values are valid WordPress user IDs or valid email values supported by that field.
- If using User Roles, make sure the selected role has users with valid email addresses.
- If storing the assignment, make sure the Post ID resolves to a real post.
- For a newly created post, make sure
{post_id:inserted}is available from the form submission. - Do not expect post-meta storage or post-author changes to work meaningfully for an external email address that is not a WordPress user.
Where to go next #
For routing submissions into different recipient pools before Rotation runs, see Conditional Recipients & Routing Rules.
For ticket-style conversations where the recipient should depend on who is replying, see Smart Recipient & Conversation Routing.
For recipients stored in JetEngine Custom Content Types, see CCT Recipients & CCT Placeholders.


