

Once you have more than one email template, the Form Templates tab becomes your main workspace for managing them.
This guide covers how to find, preview, duplicate, activate, rename, and remove templates without going back through the full setup process each time.
Open the Form Templates tab #
- Go to WordPress Admin → Nelx JFB Email Templates.
- Open the Form Templates tab.
If you already have saved templates, the plugin loads them when the page opens. While this is happening, you will see a progress bar showing how many templates have finished loading.
The progress bar stays visible while loading is still in progress and disappears once all saved templates have been initialized.

Expand and collapse templates #
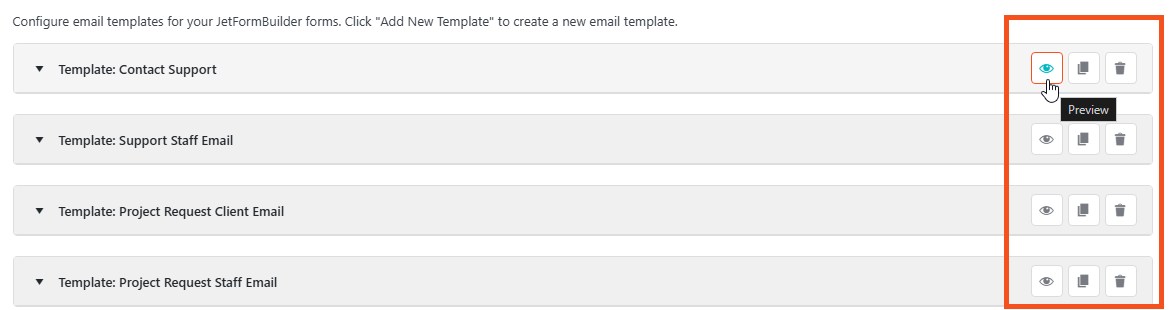
Each saved template appears as a collapsible panel.
Click the template header to open it. Opening one template automatically collapses any other template that is currently open. This keeps the page easier to work with when you have several templates.
Click the same header again to collapse it.
The template header also contains the main template actions:
- Preview — see how the email currently looks.
- Duplicate — create a copy of the template.
- Remove — delete the template.
Rename a template #
Open the template and change the Template Name field.
Give each template a name that tells you what it is for. Multiple templates can use the same JetFormBuilder form, so names such as these are much easier to manage than using the form name alone:
- Support Request — Customer Confirmation
- Support Request — Staff Notification
- Job Application — Applicant Confirmation
- Job Application — HR Notification
The name shown in the template header updates as you edit the Template Name field.
Preview a template #
Click the eye icon in the template header.
The plugin generates a preview from the template as it is currently configured and opens it in a separate browser window.
Preview is useful when checking:
- subject and content layout;
- email branding;
- buttons and styled sections;
- message box styling;
- placeholder placement;
- the general structure of the email.
A preview shows how the template is built, but it does not replace a real form submission test. Before using an important template on a live site, submit the actual JetFormBuilder form and confirm that the email reaches the correct recipient with the expected data.
Duplicate a template #
Use Duplicate when you want to create another template based on an existing one.
The form must already be selected in the original template before it can be duplicated.
The copied template is created with (Copy) added to its name. You can then rename it and change only the settings that need to be different.
This is particularly useful when one form needs several emails. For example, you can create the customer confirmation first, duplicate it, then turn the copy into an internal staff notification.
If your plan has a template limit, a duplicated template counts toward that limit. The Duplicate button is unavailable when another template cannot be added.
Activate or pause a template #
At the bottom of each template is the Status setting.
When Active (send this email on form submission) is enabled, the template can send when its form is submitted.
Turn Status off when you want to keep a template without sending it. This is useful while you are still preparing a template or when you want to temporarily stop an email without deleting its configuration.
After changing Status or any other saved setting, click Save Changes at the top of the plugin page.
Remove a template #
Click the trash icon in the template header.
The plugin asks you to confirm before removing the template. Once a saved template is deleted, it is removed from the template list.
If you may need the template again, it is usually safer to turn Status off instead of deleting it.
Working with several templates for one form #
You are not limited to one email template per JetFormBuilder form.
A single form can have separate templates for different purposes, for example:
| Template | Purpose |
|---|---|
| Customer Confirmation | Confirms that the submission was received |
| Staff Notification | Sends the submission to the team handling it |
| Manager Escalation | Sends only when a routing condition is met |
This is why a clear Template Name matters. It helps you tell the templates apart even when they all use the same form.
If a template is not sending #
Before changing advanced settings, check the basics first:
- Make sure the correct form is selected.
- Make sure Status is active.
- Check that the recipient settings resolve to a valid email address or WordPress user.
- Click Save Changes after editing the template.
- Submit the actual form rather than relying only on Preview.
If the template uses conditions, rotation, Smart Recipient, CCT recipients, or another advanced recipient method, continue with the relevant recipient guide.
Where to go next #
If you only need to change who receives an email, continue with Recipients & Delivery Options.
If recipients should change according to form answers, continue with Conditional Recipients & Routing Rules.
For evenly distributing submissions between several users, see Round-Robin Rotation & Assignment Tracking.


