

Modern Media Upload replaces the normal JetFormBuilder Media Field upload experience with a drag-and-drop uploader that can upload files immediately and show real upload progress.
It works with normal Media Fields, Media Fields inside Repeaters, guest forms where uploads are permitted, and preset files loaded into edit forms.
JetFormBuilder still controls the field rules. Nelx JFB Email Templates changes the upload experience and connects the uploaded file back to the normal form submission.
Before You Start #
Make sure your form already contains a JetFormBuilder Media Field.
Configure the field in JetFormBuilder first, including:
- allowed file types;
- maximum file size;
- maximum number of files;
- upload permission.
Modern Media Upload reads those rules from the Media Field. It does not replace them with a second set of limits.
Open the Media Upload Settings #
Go to:
WordPress Admin → Nelx JFB Email Templates → Media Upload
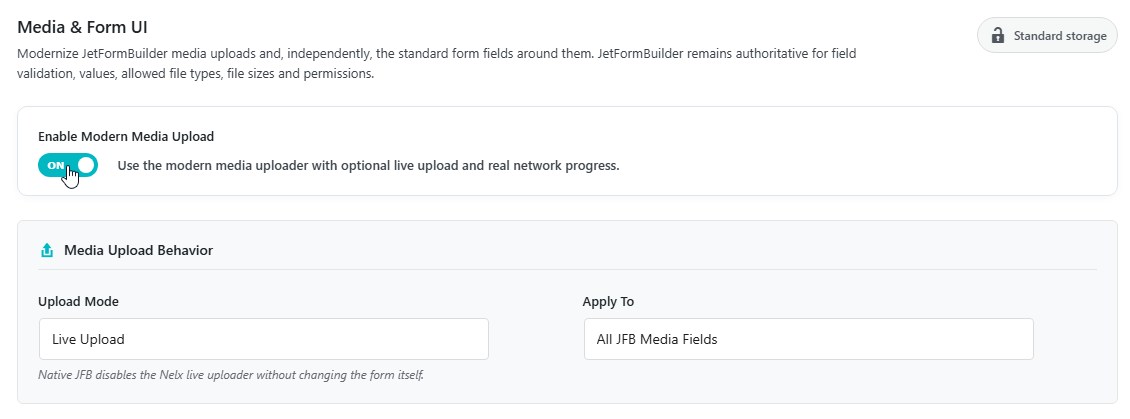
The settings area is headed Media & Form UI.
Turn on:
Enable Modern Media Upload
The Media Upload settings appear below the switch.
Choose the Upload Mode #
Under Media Upload Behavior, choose an Upload Mode.
Live Upload #
Choose Live Upload to use the modern uploader.
When a visitor chooses or drops a file, the upload starts immediately. The file does not wait for the final form submission before being transferred.
This allows the uploader to show the actual upload progress for each file.
Native JFB #
Choose Native JFB when you want JetFormBuilder to handle the Media Field normally.
This disables the Nelx live uploader without changing the JetFormBuilder form itself.
Use this when a particular site or form should keep JetFormBuilder’s normal media-upload behavior.
Choose Where It Applies #
Under Apply To, choose:
- All JFB Media Fields
- Only Media Fields with CSS Class
All JFB Media Fields #
The live uploader is applied to eligible JetFormBuilder Media Fields across the site.
Only Media Fields with CSS Class #
Use this when you want to modernize selected Media Fields only.
Enter the class in Target CSS Class without the leading dot.
For example:
media_imageThen add that class to the Media Field you want to target.
What the Visitor Sees #
The uploader provides:
- a drag-and-drop area;
- a Browse files button;
- file type and size information taken from the Media Field;
- a file card for each selected file;
- real upload progress;
- uploaded and error states;
- a remove button.
Images can show a small preview. Other files use a file indicator.
Live Upload Progress #
When a file is selected, the upload begins immediately.
The file card shows:
- the filename;
- file size;
- current status;
- progress bar;
- percentage.
The percentage comes from the browser’s actual upload progress rather than from a timed animation.
When the server confirms the upload, the file changes to the uploaded state.
If the upload fails, the file shows an error state instead.

The Form Cannot Submit While a File Is Still Uploading #
While any live upload is active, the form’s submit button is disabled.
If something else tries to submit the form while an upload is still running, the submission is stopped and the user is asked to wait for the file upload to finish.
When all uploads finish or are cancelled, the submit button returns to its previous state.
This prevents a form from being submitted while its file is only partly uploaded.
Removing a Newly Uploaded File #
A file card includes a remove button.
If the file is still uploading, removing it cancels the upload.
If the live upload has already completed but the form has not yet been successfully submitted, removing it deletes that pending upload.
The file is also removed from the value that will be passed into the form submission.
File Validation #
The uploader checks the rules from the JetFormBuilder Media Field.
A file can be rejected when:
- the maximum number of files has already been reached;
- the file is larger than the Media Field allows;
- the file type is not allowed;
- the same file has already been added to that upload field.
The server validates the upload again rather than relying only on the browser check.
Required Media Fields #
A required Media Field remains required.
The live uploader temporarily manages the browser input itself, then checks that at least one uploaded or existing file is available before allowing the form to submit.
An existing preset file also counts as an available file.
Guest Uploads #
Modern Media Upload supports logged-out visitors when the JetFormBuilder Media Field allows them to upload.
The Media Field’s permission setting remains in control.
If that field is restricted to logged-in users or to a WordPress capability the visitor does not have, the live uploader does not bypass the restriction.
For guest submissions, the plugin keeps the internal attachment handling needed for the upload while preserving JetFormBuilder’s normal public form value behavior.
You do not need to configure a separate guest mode in Nelx JFB Email Templates.
Media Fields Inside Repeaters #
Modern Media Upload works with Media Fields inside JetFormBuilder Repeaters.
Each repeater row keeps its own upload field and its own files.
It also works with repeater rows added after the page has loaded.
If a repeater row is removed before the form is submitted, pending live uploads in that row are removed as part of the row removal.
For attaching repeater uploads to an email, see File Attachments & Secure Documents.
Existing Files in Edit or Preset Forms #
If JetFormBuilder loads an existing Media Field value, the modern uploader shows that file as an existing uploaded item.
The existing file:
- is not uploaded again;
- remains part of JetFormBuilder’s saved field value;
- counts toward the field’s maximum file count;
- can be removed through the modern file card.
When the user removes an existing file, the uploader hands that action back to JetFormBuilder’s existing removal control rather than treating the saved file as a new live upload.
For authorized logged-in users, the uploader can also load the saved file’s display metadata so the preserved original filename can be shown where available.
Using Nelx Secure Document Storage #
The top of the Media Upload settings shows whether Nelx Secure Document Storage is available.
If it is not active, live uploads use the normal WordPress and JetFormBuilder attachment flow.
If it is active and the form is configured for secure storage:
- the live file goes into protected pending storage;
- the file remains pending while the form is being completed;
- the form submission is verified by JetFormBuilder;
- the file is finalized through Nelx Secure Document Storage;
- the original filename is retained for email and controlled downloads.
Secure storage is optional. Modern Media Upload also works without it.
For email attachment handling, see File Attachments & Secure Documents.
What Happens If the Form Is Never Successfully Submitted? #
A live upload is initially marked as pending.
After a successful form submission, the upload is committed to that submission.
Pending live uploads that are abandoned are cleaned up automatically later.
This prevents unfinished form sessions from leaving pending uploads indefinitely.
Customize the Uploader Text #
Under Media Upload Text, you can change:
- Dropzone text
- Drag-over text
- Browse button text
- Uploading status
- Uploaded status
For example, you could change:
Drag & drop files here
to:
Drop your supporting documents here
These labels affect the uploader shown on the frontend.
Customize the Appearance #
Under Media Upload Appearance, you can set:
- Primary
- Progress
- Success
- Error
- Dropzone Background
- Border Radius
The preview below the settings lets you see the main dropzone appearance before using it on the frontend.
The file restrictions shown in the preview are not configured here. They come from the individual JetFormBuilder Media Field.
Modern Media Upload and Modern Form Fields Are Independent #
You can enable Modern Media Upload without enabling Modern Form Fields.
You can also enable Modern Form Fields while leaving Media Upload in its normal JetFormBuilder mode.
Use each feature only where you need it.
If the Modern Uploader Does Not Appear #
Check these points:
- Make sure Enable Modern Media Upload is on.
- Make sure Upload Mode is set to Live Upload.
- If Apply To uses a CSS class, check that the class is on the Media Field and that you entered it without a leading dot.
- Confirm that the field is a JetFormBuilder Media Field.
- If you previously used the standalone Modern Media Upload prototype snippet, disable that prototype so the built-in feature can run.
- Save the settings and reload the frontend form.
If a File Is Rejected #
Check the JetFormBuilder Media Field first.
Confirm its:
- allowed file types;
- maximum file size;
- maximum number of files;
- upload permission.
Modern Media Upload follows those settings.
Where to Go Next #
For attaching uploaded files to an email, continue with File Attachments & Secure Documents.
For the other form controls around the uploader, continue with Modern Form Fields.
For Media Fields inside Repeaters that also appear in the email body, see Repeater Fields in Email Templates.


