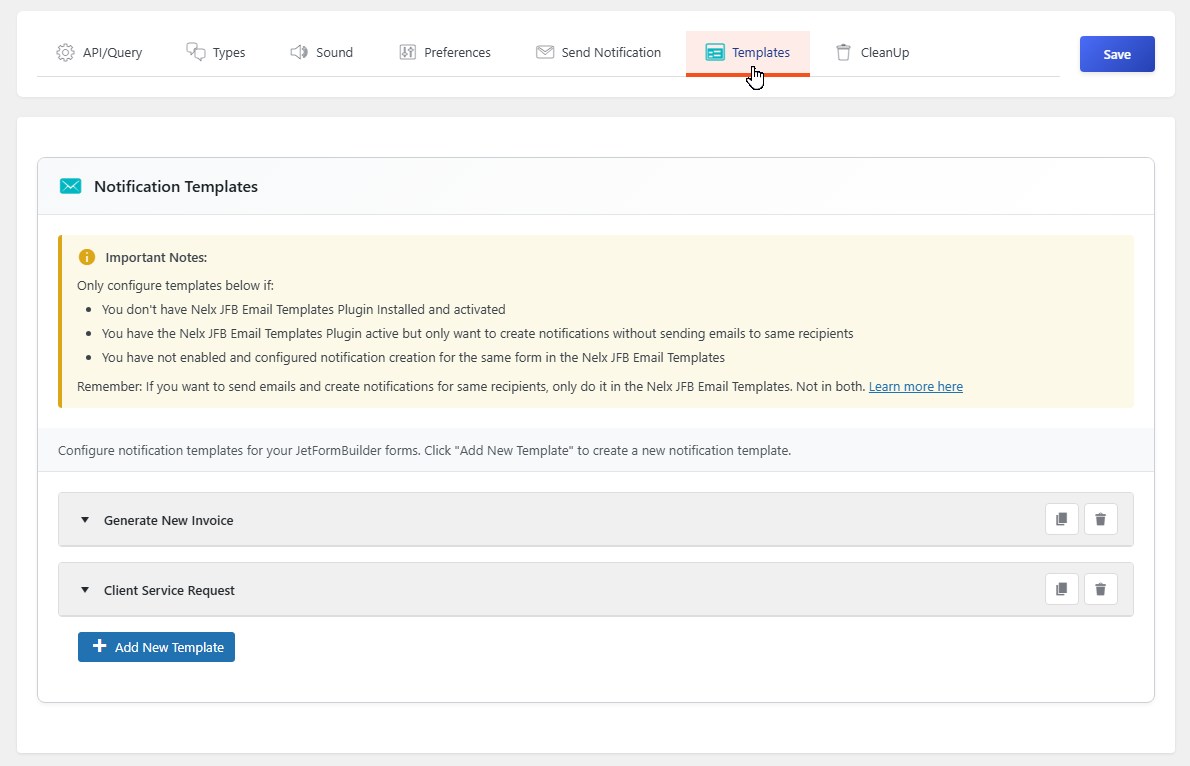
Overview #
The Notification Templates tab allows you to create automated notifications that are triggered when someone submits a JetFormBuilder form. Instead of manually sending notifications each time, you can set up templates that handle everything automatically.
When to Use This Feature #
This feature is useful in three scenarios:
- You don’t have the Nelx JFB Email Templates plugin installed — Use this to create notifications without emails
- You have the email plugin but only want notifications — If you only need in-app notifications without email delivery
- You have not enabled and configured notification creation for the same form in the Nelx JFB Email Templates — Use this as a standalone solution
Important: If you’re using the Nelx JFB Email Templates plugin with notifications enabled, configure everything there instead. Don’t use both systems simultaneously for the same form.
Getting Started #
Prerequisites #
Before creating notification templates, make sure:
- Your JetFormBuilder forms are created — Templates need a form to work with
- Your CCT is configured — The system needs your notification CCT settings from the API/Query tab
- Notification types are set up — Configured in the Notification Types tab
Creating a New Template #
Step 1: Click “Add New Template” #
At the bottom of the page, click the Add New Template button. A new template section will open with all the configuration options.

Step 2: Select Your Form #
At the top of each template, you’ll find a form selector:
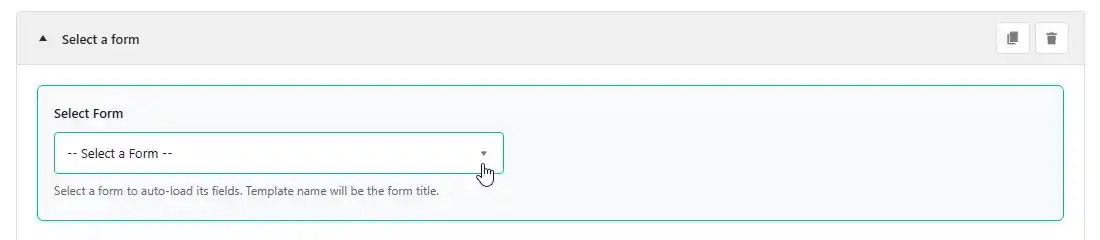
- Click the dropdown to see all your JetFormBuilder forms
- Start typing to search for a specific form
- The template title will automatically show the selected form’s name
Note: You must select a form first before you can access any form fields in the settings below.
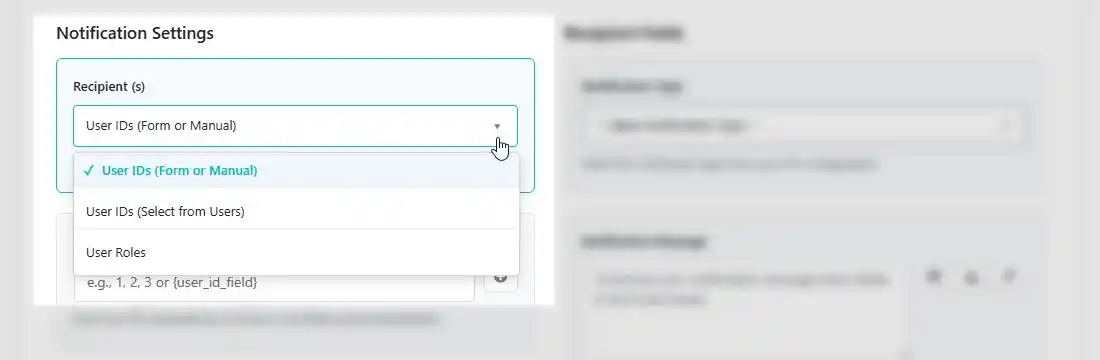
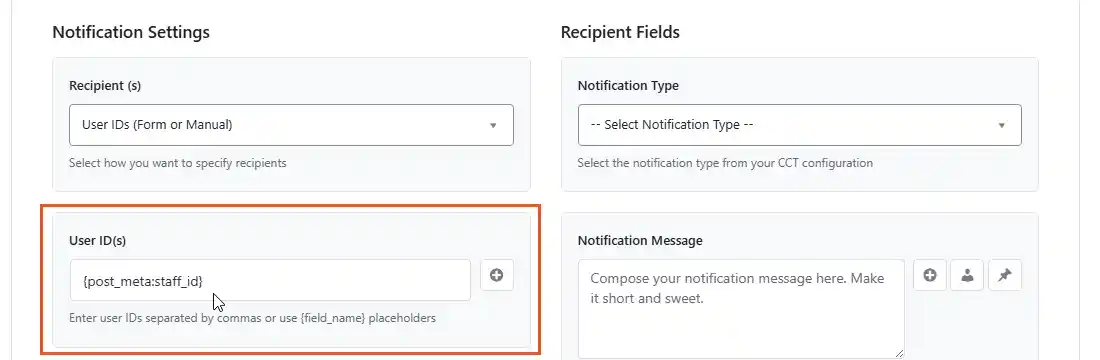
Step 3: Configure Recipients (Who Gets the Notification) #
Recipient Type #
Choose how you want to specify who receives the notification:
| Recipient Type | What It Means |
|---|---|
| User IDs (Form or Manual) | Enter user IDs directly or use form field placeholders |
| User IDs (Select from Users) | Search and select users from a dropdown |
| User Roles | Send to all users with specific roles |
Standard Recipients (User IDs) #
- Enter user IDs separated by commas (e.g.,
1, 2, 3) - Or use form field placeholders like
{assigned_staff_id}to pull user IDs from the form submission
Click the + button next to the field to open a searchable dropdown of all form fields.
Select from Users #
- Hold Ctrl (Windows) or Cmd (Mac) to select multiple users
- All selected users will receive the notification
User Roles #
- Hold Ctrl (Windows) or Cmd (Mac) to select multiple roles
- All users with any of the selected roles will receive the notification
Step 4: Enable Rotation (Round-Robin Assignment) #
Turn on Enable Rotation to distribute form submissions evenly among your team members.
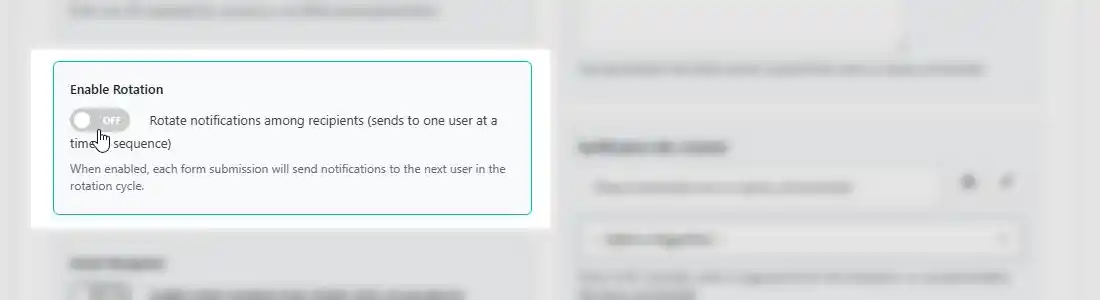
How Rotation Works #
- Each form submission sends a notification to one user at a time in sequence
- The system tracks who received which submission
- Perfect for support tickets, lead distribution, or task assignments
Example: If you have 3 support staff members, the first ticket goes to Staff A, the second to Staff B, the third to Staff C, the fourth back to Staff A, and so on.
Rotation with Recipient Types #
- User IDs (Form or Manual) — Rotates among the specified user IDs
- Select from Users — Rotates among the selected users
- User Roles — Rotation does not apply; all role members receive the notification
Step 5: Smart Recipient (Ticket-Style Conversations) #
Turn on Smart Recipient for intelligent conversation routing — perfect for support tickets, task discussions, or any multi-party communication.
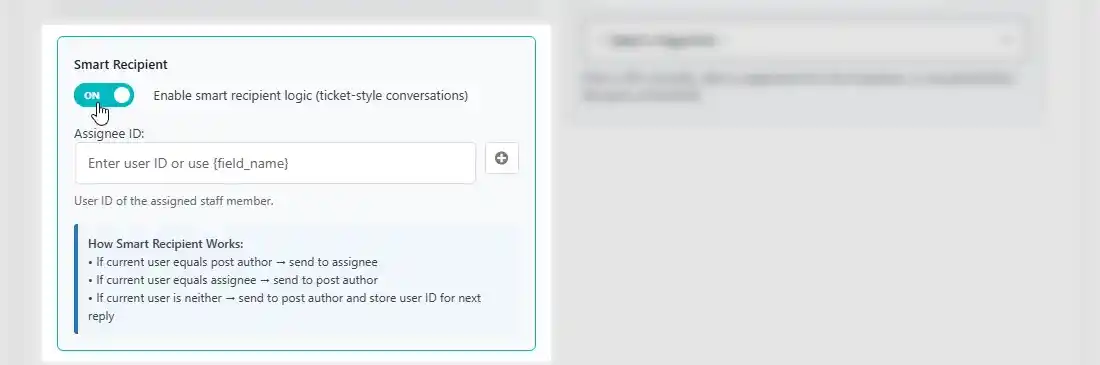
How Smart Recipient Works #
| Scenario | Recipient |
|---|---|
| Current user = Post Author (client replying) | Send to Assignee |
| Current user = Assignee (staff replying) | Send to Post Author |
| Current user = Neither (third party replying) | Send to Post Author + store third party ID for next reply |
Setting Up Smart Recipient #
- Toggle on Enable Smart Recipient
- Assignee ID — Enter the user ID of the assigned staff member
- Enter a manual ID (e.g.,
5) - Or use a form field placeholder like
{assigned_staff_id}
- Enter a manual ID (e.g.,
Third Party Participant Tracking #
- When someone who is neither the post author nor the assignee replies, the notification is sent to the post author
- The third party’s user ID is stored for future replies
- On the next reply, the system checks this stored ID to include them in the conversation
Important Notes #
- Requires a post ID — Smart Recipient needs a post to work with for determining post author
- Cannot be used with Conditional Recipients — Enabling one disables the other
- Perfect for support ticket systems, task discussions, and project management workflows
Step 6: Configure Notification Content #
Notification Type #
Select the notification type from the dropdown. This dropdown is automatically populated from your CCT configuration (set up in the Notification Types tab).
If no types are configured, you’ll see a text field where you can enter a type manually (e.g., ticket, invoice, general).

Note sure where the notification type dropdown options come from? Well, the options in this dropdown come from your CCT notification event type radio field. Please refer to Getting Started section.
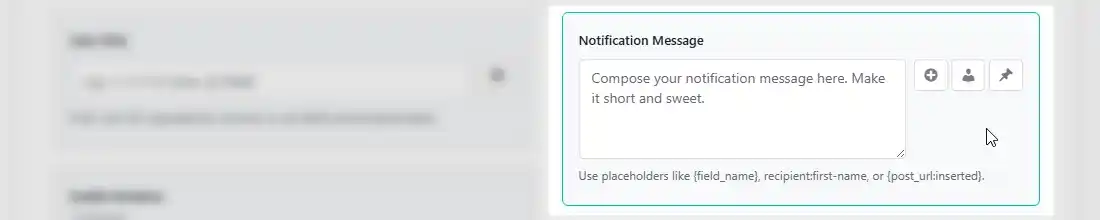
Notification Message #
Compose the message that users will see in their notification list.
Available Placeholders:
| Placeholder Type | Examples | Where to Use |
|---|---|---|
| Form Fields | {first_name}, {task_title}, {assigned_by} | Anywhere |
| Recipient Placeholders | recipient:first-name, recipient:name | Message content |
| Current User Placeholders | currentuser:displayname, currentuser:first-name | Message content |
| Post Data | {post_id:inserted}, {post_title:inserted} | Message content |
| Post Data | {post_url:inserted} | Notification URL |
Special Placeholders:
{form_field:term} — use this in the following case: you have a select dropdown whose options are fetched from a term. For example, you have a taxonomy called subjects with these tags: Math, Physics, Biology, English, and Chemistry.
You want the notification message to look something like ‘A student has submitted a new Physics assignment’. Your message should be: ‘A student has submitted a new {subject:term} assignment’ assuming (subject) is the form field for the dropdown.
{post_meta:meta_field} — use this in the following case: the recipient is not determined until a form has been successfully submitted.
The recipient ID is generated elsewhere programmatically and stored in the inserted post (a CPT that your form creates upon submission) in a meta field you set.
For instance, if the meta field that stores the recipient’s ID is say, staff_id, your recipient user ID field will be {post_meta:staff_id}
Now when a form is submitted, the system will get the notification recipient from the provided meta field after the post is created and the ID made available.
Insert Buttons:
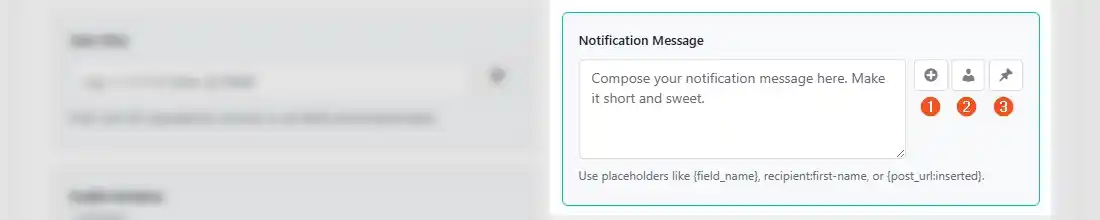
- + — Insert form field placeholders (searchable dropdown)
- 👤 — Insert recipient placeholders/current user placeholders (first name, last name, username, etc.)
- 📌— Insert post data placeholders (post ID, title, URL)
Notification URL Content (Optional) #
Add a link that users can click to see more details. This becomes the “See details” link in the notification.
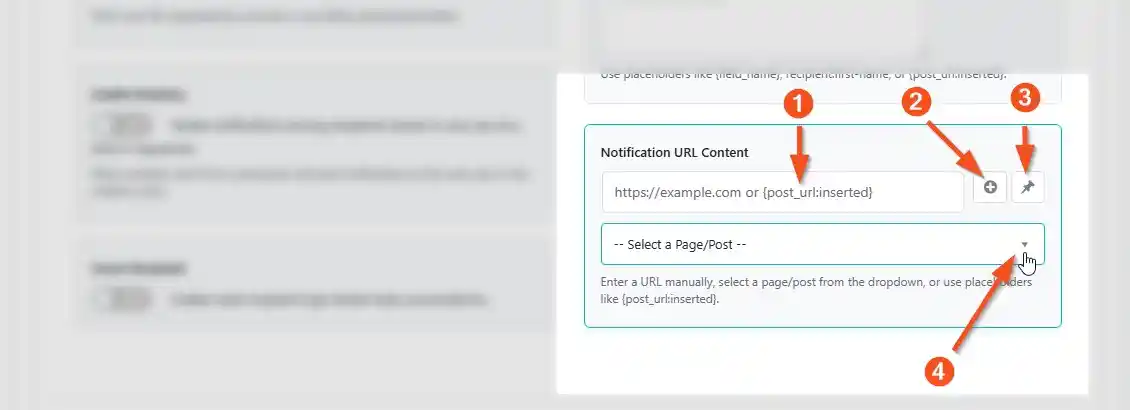
Ways to set the URL:
- Enter a URL manually —
https://example.com/ticket/123 - User form field placeholder — {post_url}
- Use post data placeholders —
{post_url:inserted} - Select a page/post from the dropdown — Click the “Select a Page/Post” dropdown to search and select a page/post from your website
Insert Buttons:
- + — Insert form field placeholders
- 📌 — Insert post data placeholders
Step 7: Conditional Recipients (Advanced) #
Turn on Conditional Recipient Logic to send notifications to different people based on form answers.

How It Works #
You can set rules such as:
- If the user selects “Sales”, send to
sales-team - If they select “Support”, send to
support-team - If priority is “High”, rotate among senior staff
- If priority is “Low”, send to all staff
Creating a Condition #
- Toggle on Enable Conditional Recipient Logic
- Click Add Recipient Condition
Setting Up Logic Clauses #
Each condition can have multiple logic clauses connected by AND or OR:
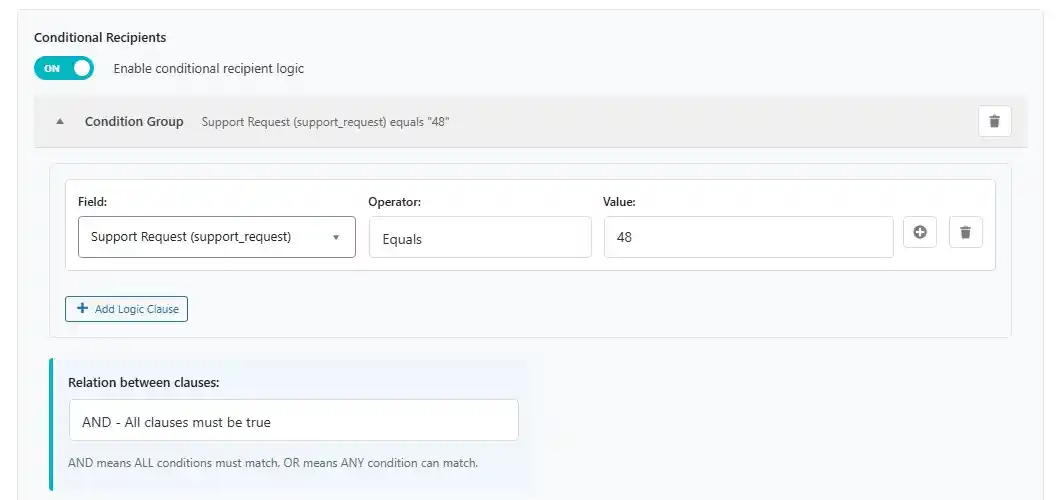
| Clause Component | What It Does |
|---|---|
| Field | Select which form field to check (e.g., a dropdown, radio button, or any other) |
| Operator | Choose the condition type (equals, contains, starts with, etc.) |
| Value | Enter the value to compare against (or leave blank for empty checks) |
Supported Operators:
- Equals / Not Equals
- Contains / Not Contains
- Starts With / Ends With
- Is Empty / Is Not Empty
IMPORTANT NOTE: If your select dropdown options are fetched from a term (see example screenshot below), use tag ID as the value.
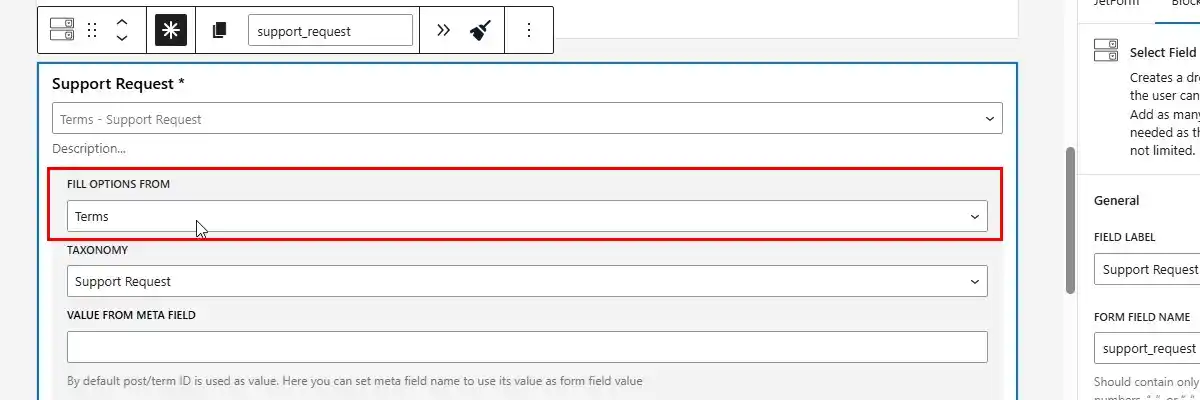
For instance, let’s say you have a taxonomy called departments with the following tags: finance (tag_ID=38), tech (tag_ID=39), sales & marketing (tag_ID=43), human resource (tag_ID=44), and procurement (tag_ID=47).
If you want to check sales & marketing as the value in your logic clause, put 43 in the value field.
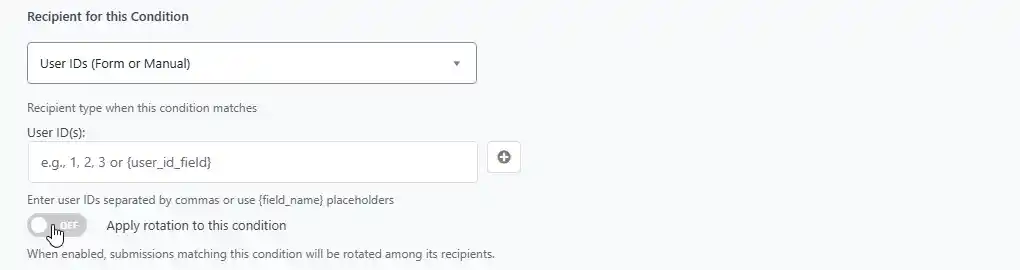
Setting Recipients for the Condition #
Below each condition, set the Recipient for this Condition — exactly the same options as Step 3 (User IDs, Select from Users, or User Roles).
Rotation Within Conditions #
- Toggle on Apply rotation to this condition to rotate submissions among recipients that match this specific condition
- Each condition has its own independent rotation cycle
Important Notes #
- The first matching condition (top to bottom) determines who gets the notification
- If no conditions match, the notification goes to the default recipients you set in Step 3
- Smart Recipient and Conditional Recipients cannot be used together — enabling one disables the other with a notice
Example: Support tickets with priority levels:
| Priority | Recipient |
|---|---|
| High | Rotate among senior support staff |
| Medium | Rotate among regular support staff |
| Low | Send to all support staff (no rotation) |
Step 8: Activate Your Template #
At the bottom of the template, you’ll see a Status toggle:

- ON (teal) — Notifications will be created when the form is submitted
- OFF (gray) — Notifications will not be created (useful for templates you’re still working on)
Managing Your Templates #
Expand/Collapse Templates #
- Click the arrow at the top of any template to expand or collapse it
- Only one template can be expanded at a time (accordion behavior)
Duplicate a Template #
Click the pages icon next to any template to create an exact copy. This is useful for creating similar templates with minor changes.
Delete a Template #
Click the trash icon and confirm to remove a template you no longer need.
Multiple Templates for the Same Form #
You can create multiple templates for the same form. When the form is submitted, all active templates will create notifications according to their settings.
Example: One form could trigger:
- A notification to the assigned staff member (rotation enabled)
- A notification to the client (confirmation)
- A notification to the manager (different recipient type)
Quick Reference: Recipient Type Summary #
| Recipient Type | Use Case | Rotation Support |
|---|---|---|
| User IDs (Form or Manual) | Known user IDs or form field values | Yes |
| Select from Users | Predefined team members | Yes |
| User Roles | Department-wide notifications | Yes |
Quick Reference: Placeholders #
| Placeholder | Output Example |
|---|---|
{first_name} | Value from the “first_name” form field |
{task_title} | Value from the “task_title” form field |
| {department:term} | Term label from form field “department” taxonomy selected term |
| {due_date:date} | Value from the “due_date” form field in the format April 16, 2026. |
recipient:first-name | Recipient’s first name (from user account) |
recipient:name | Recipient’s full name |
currentuser:displayname | Current logged-in user’s display name |
{post_id:inserted} | ID of the post created by the form |
{post_title:inserted} | Title of the post created by the form |
{post_url:inserted} | URL of the post created by the form |
Troubleshooting #
Templates Not Creating Notifications #
- Verify the template status is Active (toggle is ON)
- Check that your CCT is properly configured in the API/Query tab
- Ensure the selected form is being submitted successfully
Recipients Not Receiving Notifications #
- Check that user IDs or roles are correct
- For form field placeholders, verify the field name matches exactly
- For role-based notifications, ensure users have the selected roles
Conditional Recipients Not Working #
- Check that the value comparison is correct (case-sensitive)
- Test with a simpler condition first
- Ensure the condition is not being overridden by another condition
Rotation Not Working #
- Ensure you have at least 2 recipients in the list
- Rotation cycles through recipients in the order they appear
Need Help? #
If you have questions about specific features or run into issues:
- Check that all prerequisites are met (JetFormBuilder, JetEngine, CCT configured)
- Test with a simple template first to isolate issues
- Contact support with details about what you’re trying to accomplish


