

Conditional Recipients let one email template send to different people depending on what was submitted in the form.
For example:
- Sales enquiries can go to the sales team.
- Billing questions can go to finance.
- High-priority requests can go to a senior member of staff.
- Different departments can use different recipient types without creating separate forms.
The default recipients in the template remain important. They are used when none of your recipient conditions match.
Before you start #
Open WordPress Admin → Nelx JFB Email Templates → Form Templates, then open the template you want to configure.
Before adding conditions:
- Select the correct JetFormBuilder form.
- Configure the template’s normal recipient under Recipient Type.
- Save a clear Template Name so you know what the template does.
If you are not familiar with Standard, User ID, User Role, or CCT recipients, read Recipients & Delivery Options first.
Enable Conditional Recipients #
Find Conditional Recipients and turn on Enable conditional recipient logic.
Click Add Recipient Condition to create your first condition group.
A condition group has two parts:
- the rule that decides whether the group matches;
- the recipient settings that should be used when it matches.

Build the condition #
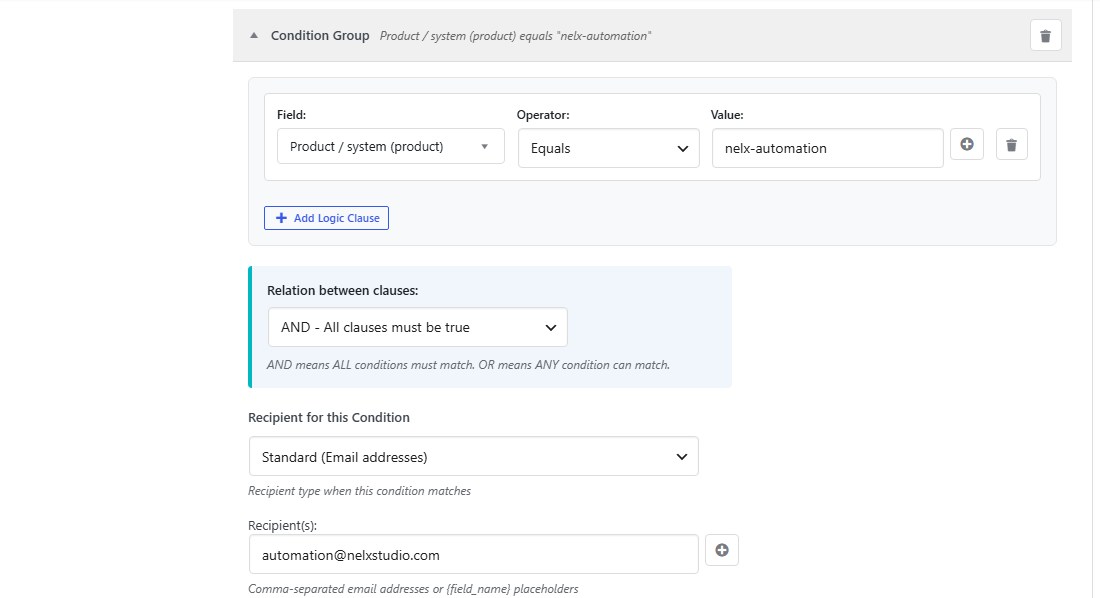
Each condition group starts with a logic clause.
A clause contains:
| Setting | What it means |
|---|---|
| Field | The JetFormBuilder field you want to check |
| Operator | How the submitted value should be compared |
| Value | The value you expect the field to contain |
For example, if your form has a field called department and its submitted value is sales, the condition could be:
Field: Department
Operator: Equals
Value: sales
Available operators #
The current operators are:
| Operator | Matches when |
|---|---|
| Equals | The submitted value matches the value you entered |
| Not Equals | The submitted value is different |
| Contains | The submitted value contains the text you entered |
| Not Contains | The submitted value does not contain the text |
| Starts With | The submitted value begins with the text |
| Ends With | The submitted value ends with the text |
| Is Empty | The field has no value |
| Is Not Empty | The field contains a value |
For Is Empty and Is Not Empty, the comparison value is not needed.
Use the submitted value, not what you assume is submitted #
For ordinary select, radio, or similar fields, make sure the value in your condition matches the value JetFormBuilder actually submits.
For example, a field may display Sales Department to the visitor but submit sales as its value. In that case, use sales in an Equals condition.
For taxonomy-based fields, the plugin can also work with the term information available with the submitted field, including the term slug, label, and ID.
If a condition is not matching, checking the actual submitted value is one of the first things to do.
Use more than one clause #
Click Add Logic Clause when a recipient should depend on more than one field.
You can then choose the Relation between clauses:
AND — All clauses must be true #
Use AND when every rule in the group must match.
Example:
- Department Equals
support - Priority Equals
high
The condition only matches when both are true.
OR — Any clause can be true #
Use OR when one matching rule is enough.
Example:
- Department Equals
sales - Department Equals
partnerships
The condition matches when either value is submitted.
Set the recipient for the condition #
Under Recipient for this Condition, choose the recipient type to use when the condition matches.
A condition supports the same main recipient types as the template:
- Standard (Email addresses)
- User ID Fields
- User Roles
- CCT Item
Configure the selected type in the same way you would configure the template’s normal recipient.
For CCT Item conditions, see CCT Recipients & CCT Placeholders for the additional CCT settings.
Condition order matters #
Condition groups are checked from top to bottom.
The first matching condition determines the recipient settings used for that submission. Once a condition matches, later groups are not used for recipient selection.
Because of this, put your more specific rules before broader rules.
For example:
- Support + High Priority → Senior Support
- Support → General Support
If the general Support rule came first, it would match before the more specific High Priority rule could be used.
What happens when no condition matches? #
The email falls back to the normal recipient settings configured in the template.
This is why you should always configure a sensible default recipient before enabling Conditional Recipients.
A simple setup could look like this:
| Condition | Recipient |
|---|---|
| Department = Sales | sales@example.com |
| Department = Billing | billing@example.com |
| Department = Support | support@example.com |
| No match | Template’s default recipient |
Rotation inside a condition #
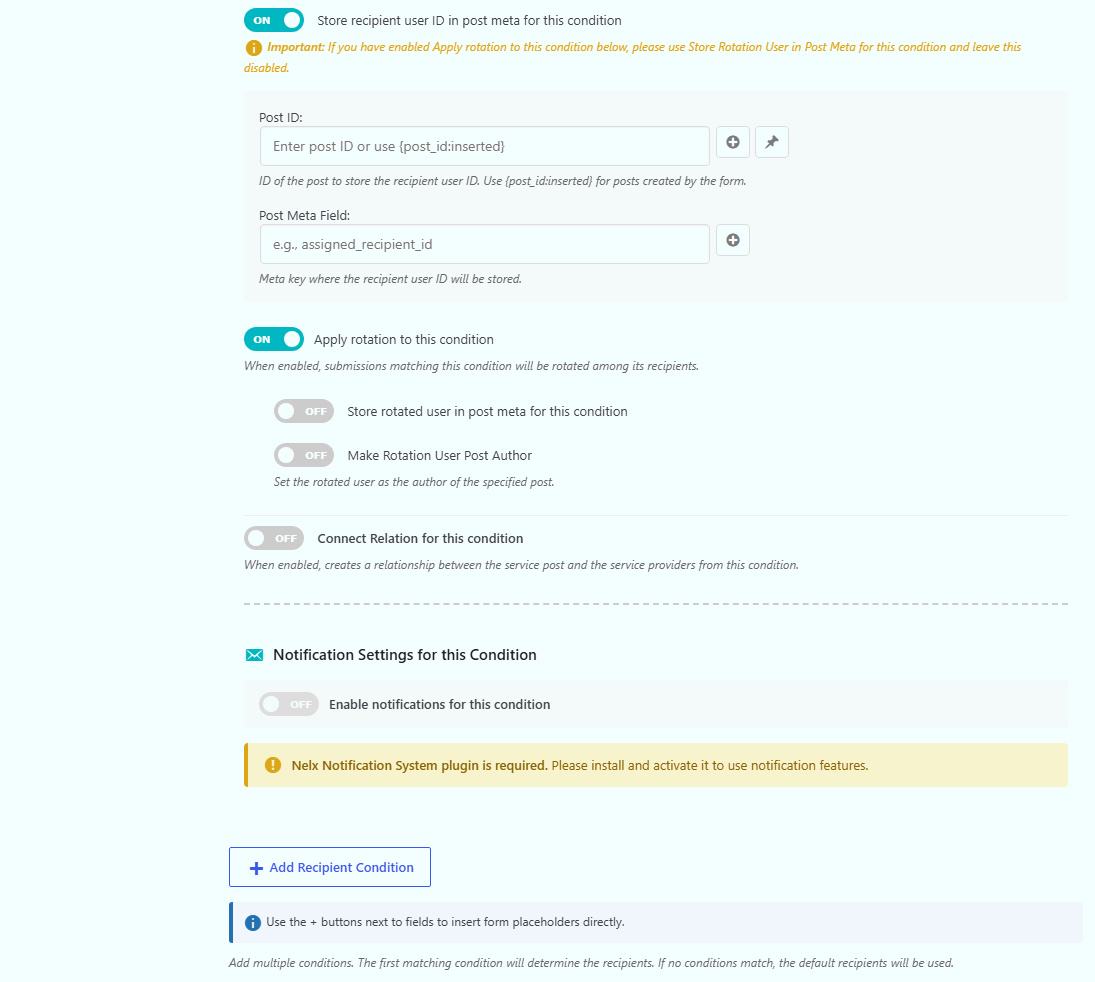
Each condition can have its own Apply rotation to this condition setting.
When enabled, submissions that match that condition are rotated among the recipients configured inside that condition.
This is useful when different groups need separate assignment pools. For example:
- High Priority → rotate among senior support staff.
- Standard Priority → rotate among the normal support team.
A condition can also store the rotated user in post meta and can make that rotated user the post author when those settings are enabled.
For the full explanation of rotation, assignment storage, and post authors, see Round-Robin Rotation & Assignment Tracking.
Store the recipient for a condition #
A condition can also enable Store recipient user ID in post meta for this condition.
Use this when a matching condition assigns one WordPress user and you want to save that user’s ID to a post.
You will need to provide:
- the Post ID where the value should be stored;
- the Post Meta Field that should receive the user ID.
If Rotation is enabled for the condition, leave this setting off and use Store rotated user in post meta for this condition instead.
Notifications for a condition #
When the Nelx Notification System integration is available, a condition can have its own notification settings.
This allows the notification created for one routing rule to be different from another. The email recipient logic and notification recipient logic stay tied to the condition that matched.
The complete setup is covered in Nelx Notification System Integration.
Connect Relation inside a condition #
If you use the JetAppointments relation feature provided by the plugin, Connect Relation can also be configured inside individual recipient conditions.
This is useful when different routing rules should create different service-provider relationships.
See Connect Relation for JetAppointments before enabling this option.
Conditional Recipients and Smart Recipient #
Conditional Recipients and Smart Recipient cannot be active together in the same template.
If Smart Recipient is enabled, the Conditional Recipients option is disabled and the plugin shows a notice. The reverse also applies when Conditional Recipients are already enabled.
This is intentional because the two features answer the same question in different ways:
- Conditional Recipients decide who receives the email from form values.
- Smart Recipient decides who receives the email from the participants in an existing conversation.
Use the one that matches the job the template is doing.
Example: route a support request by department and priority #
Suppose a form has these fields:
departmentpriority
You could create these condition groups:
Condition 1 #
- Department Equals
support - Priority Equals
high - Relation: AND
- Recipient: Senior Support role
Condition 2 #
- Department Equals
support - Recipient: General Support role
Condition 3 #
- Department Equals
billing - Recipient:
billing@example.com
Then keep your normal template recipient as the fallback for anything that does not match those groups.
The important part is the order: the High Priority Support condition comes before the broader Support condition.
If a condition is not working #
Check these in order:
- Confirm the correct JetFormBuilder form is selected.
- Check the actual submitted field value.
- Make sure the correct operator is being used.
- If the group has several clauses, check whether the relation should be AND or OR.
- Confirm that an earlier condition is not matching first.
- Check that the recipient configured inside the matching condition resolves to a valid address or user.
- Make sure Smart Recipient is not enabled for the same template.
- Save the template after making changes, then test with a real form submission.
Where to go next #
For rotating submissions between users, continue with Round-Robin Rotation & Assignment Tracking.
For ticket-style conversations, continue with Smart Recipient & Conversation Routing.
For CCT-based conditions, see CCT Recipients & CCT Placeholders.
For condition-specific in-app notifications, see Nelx Notification System Integration.


