

Placeholders let you pull submitted form data, recipient details, post data, dates, and other values into an email automatically.
You can use them in places such as the Subject and Email Content fields so one template can produce a different email for every submission.
This guide is the main reference for the placeholder formats supported by Nelx JFB Email Templates.
Before you start #
Open WordPress Admin → Nelx JFB Email Templates → Form Templates, then open the template you want to edit.
Select the JetFormBuilder form first. The plugin can only load that form’s fields after a form has been selected.
If you are creating your first template, read Creating Your First Email Template before using the advanced formats in this guide.
Normal form fields #
For a normal JetFormBuilder field, wrap the field name in curly braces:
{field_name}
For example, if your form has these fields:
first_nameemailmessage
you can write:
Hello {first_name},

Thank you for your message.

We will reply to {email} shortly.
When the form is submitted, the placeholders are replaced with the submitted values.
Use the field name, not the field label #
The placeholder must match the field’s actual name in JetFormBuilder.
If the visible label is Company Name but the field name is:
company_name
use:
{company_name}
Insert fields without typing them #
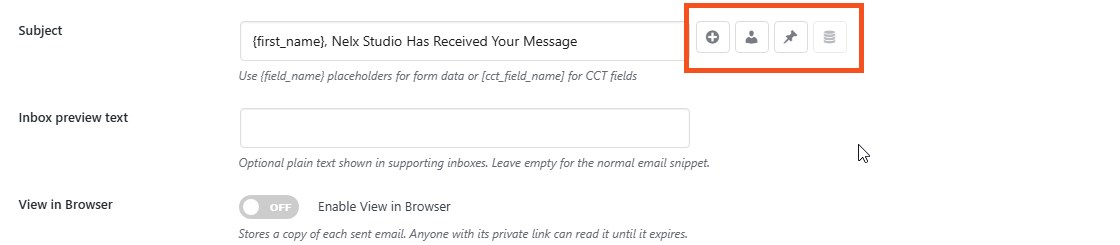
Beside supported template fields, the plugin provides quick-insert buttons.
Depending on the field you are editing, you may see buttons for:
- Insert Form Field
- Recipient
- Post Data
- Button Macro
- CCT Field
Click the relevant button and choose the item you want to insert.
This is the safest way to avoid typing mistakes, especially when a form has many fields.
Recipient placeholders #
Recipient placeholders insert details about the resolved recipient. When the recipient matches a WordPress user, the values come from that user account. For an external email address, the plugin uses the part before @ as the available name/username fallback.
They do not use curly braces.
| Placeholder | Output |
|---|---|
recipient:first-name | Recipient’s first name |
recipient:last-name | Recipient’s last name |
recipient:username | Recipient’s WordPress username |
recipient:displayname | Recipient’s display name |
recipient:name | Recipient’s full name, with username used as a fallback |
Example:
Hello recipient:first-name,

A new task has been assigned to you.
These placeholders are especially useful when the recipient comes from a User ID, User Role, Rotation, Smart Recipient, or another recipient setup that resolves to a known user.

Multiple recipients #
When several recipients are sent one email with additional recipients in BCC, the content is personalized using the primary recipient.
If each person needs their own personalized copy, use a workflow that sends to recipients individually, such as Rotation where appropriate.
For recipient setup, see Recipients & Delivery Options.
Current user placeholders #
Current-user placeholders pull details from the logged-in WordPress user who is submitting the form.
They also do not use curly braces.
| Placeholder | Output |
|---|---|
currentuser:first-name | Current user’s first name |
currentuser:last-name | Current user’s last name |
currentuser:displayname | Current user’s display name |
currentuser:username | Current user’s username |
currentuser:name | Current user’s full name, with username used as a fallback |
Example:
Submitted by: currentuser:displaynameUse these placeholders only when the workflow expects a logged-in user. A guest submission does not have a WordPress user account for these values to come from.

Inserted post data #
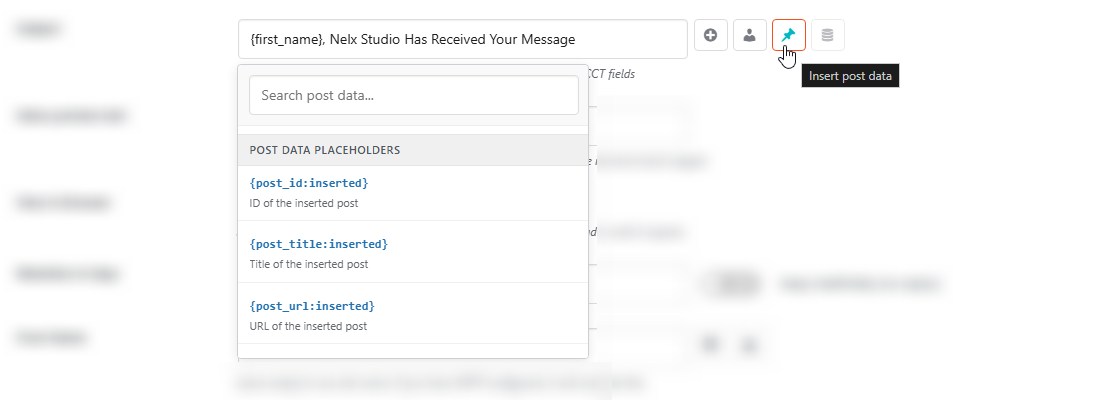
If the JetFormBuilder submission creates a WordPress post, you can use the inserted-post placeholders after that post has been created.
| Placeholder | Output |
|---|---|
{post_id:inserted} | ID of the newly inserted post |
{post_title:inserted} | Title of the newly inserted post |
{post_url:inserted} | URL of the newly inserted post |
Example:
Your request has been created.

Reference: #{post_id:inserted}

[button:{post_url:inserted}]View Request[/button]
These values are also useful in workflow settings such as assignment storage where the newly created post needs to be identified.
Post meta #
Use:
{post_meta:meta_key}
to read a custom-field value from the post created by the form.
For example:
{post_meta:assigned_staff_id}
This is useful when another action adds data to the newly created post and you want that value in the email.
The placeholder depends on an inserted post being available. If your form does not create a post, there is no inserted post from which to read that meta value.
Select, radio, and checkbox values #
Choice fields often store a machine-friendly value that is not suitable for an email.
For example, a field may store:
private_limited
while you want the email to show:
Private Limited
Nelx JFB Email Templates provides two formats for this.
Options from a JetEngine Glossary #
Use:
{field_name:glossary|ID}
Replace ID with the glossary ID.
Example:
{company_type:glossary|84}
If the submitted value is private_limited and glossary 84 maps that value to Private Limited, the email shows the glossary label.
Use this format when the field options come from a JetEngine Glossary.
Manually entered options #
Use:
{field_name:options}
Example:
{experience_level:options}
This turns values such as:
senior_levelinto Senior Levelhr_departmentinto HR Departmentapi_integrationinto API Integration
The formatter also preserves common acronyms instead of forcing them into normal title case.
Use this format for option values entered manually in the form rather than sourced from a glossary.
Term labels #
If a field stores a WordPress term ID, use:
{field_name:term}
Example:
{service_category:term}
The email displays the term name instead of the numeric term ID.
Dates and times #
You can explicitly format a field as a date, time, or date and time.
| Format | Example |
|---|---|
{field_name:date} | {appointment_date:date} |
{field_name:time} | {appointment_time:time} |
{field_name:datetime} | {created_at:datetime} |
Formatting follows the WordPress date, time, and timezone settings used by the site.
The plugin can also recognise Unix timestamps in fields whose names clearly indicate date or time data, but using the explicit format above is clearer when you know how you want the value displayed.
System placeholders #
The following values come from WordPress rather than from the submitted form:
| Placeholder | Output |
|---|---|
{site_name} | WordPress site name |
{site_url} | Site home URL |
{current_date} | Current date using the WordPress date format |
{current_time} | Current time using the WordPress time format |
The footer also supports:
[year]{year}
for the current year.
Footer branding is covered in Email Branding & Global Styles.
CCT placeholders use square brackets #
JetEngine Custom Content Type fields use a different format:
[field_name]
For example:
[client_name]
or:
[expiry_date:date]
Do not replace the square brackets with curly braces. CCT placeholders are resolved from the CCT item selected by the template.
For the complete setup, see CCT Recipients & CCT Placeholders.
Repeater fields #
A repeater can be inserted using its normal field name:
{repeater_name}
The plugin formats the repeater into an email-friendly desktop table and a mobile card layout.
If some repeater sub-fields need glossary labels or option formatting, the repeater supports an extended format such as:
{order_items|product_type:glossary|45,shipping_method:options}
Repeater syntax and output are covered in Repeater Fields in Email Templates.
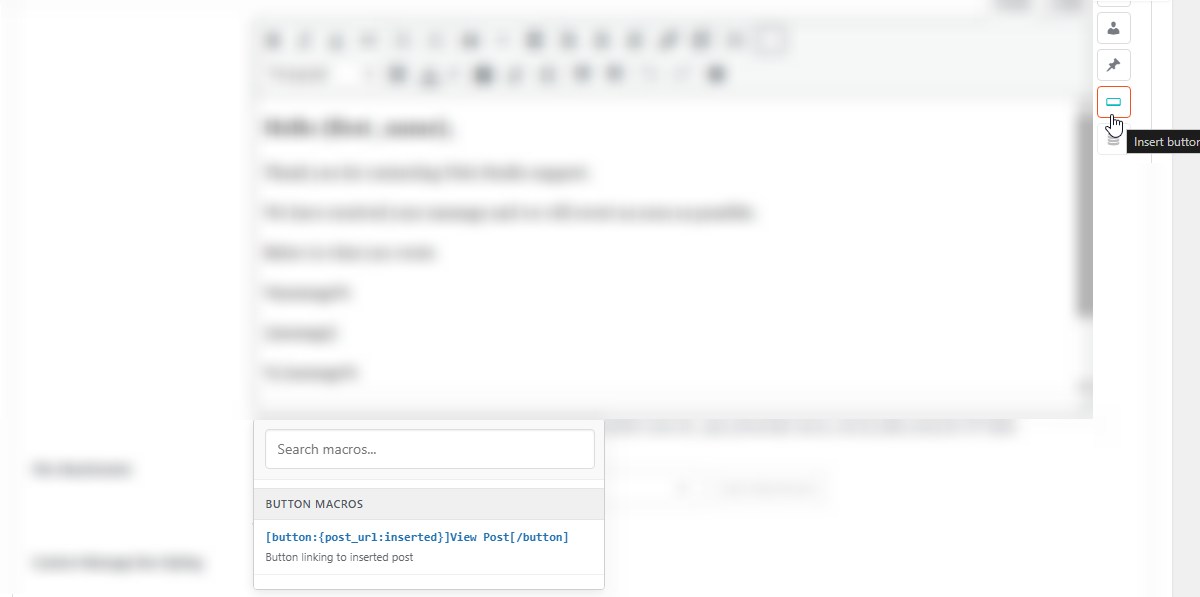
Button macros #
Use a button macro when you want a link to appear as a styled email button.
The format is:
[button:URL]Button Text[/button]
Example with a normal URL:
[button:https://example.com/account/]Open Account[/button]
Example with an inserted-post placeholder:
[button:{post_url:inserted}]View Request[/button]
Placeholders can be used inside the button URL where the resolved value forms a valid URL.
The button’s colors, spacing, border, typography, and responsive alignment come from Email Branding. The macro controls where the button appears and where it links.
For more on buttons and template-level sections, see Template Styling: Message Boxes, Sections & Buttons.
Section macros #
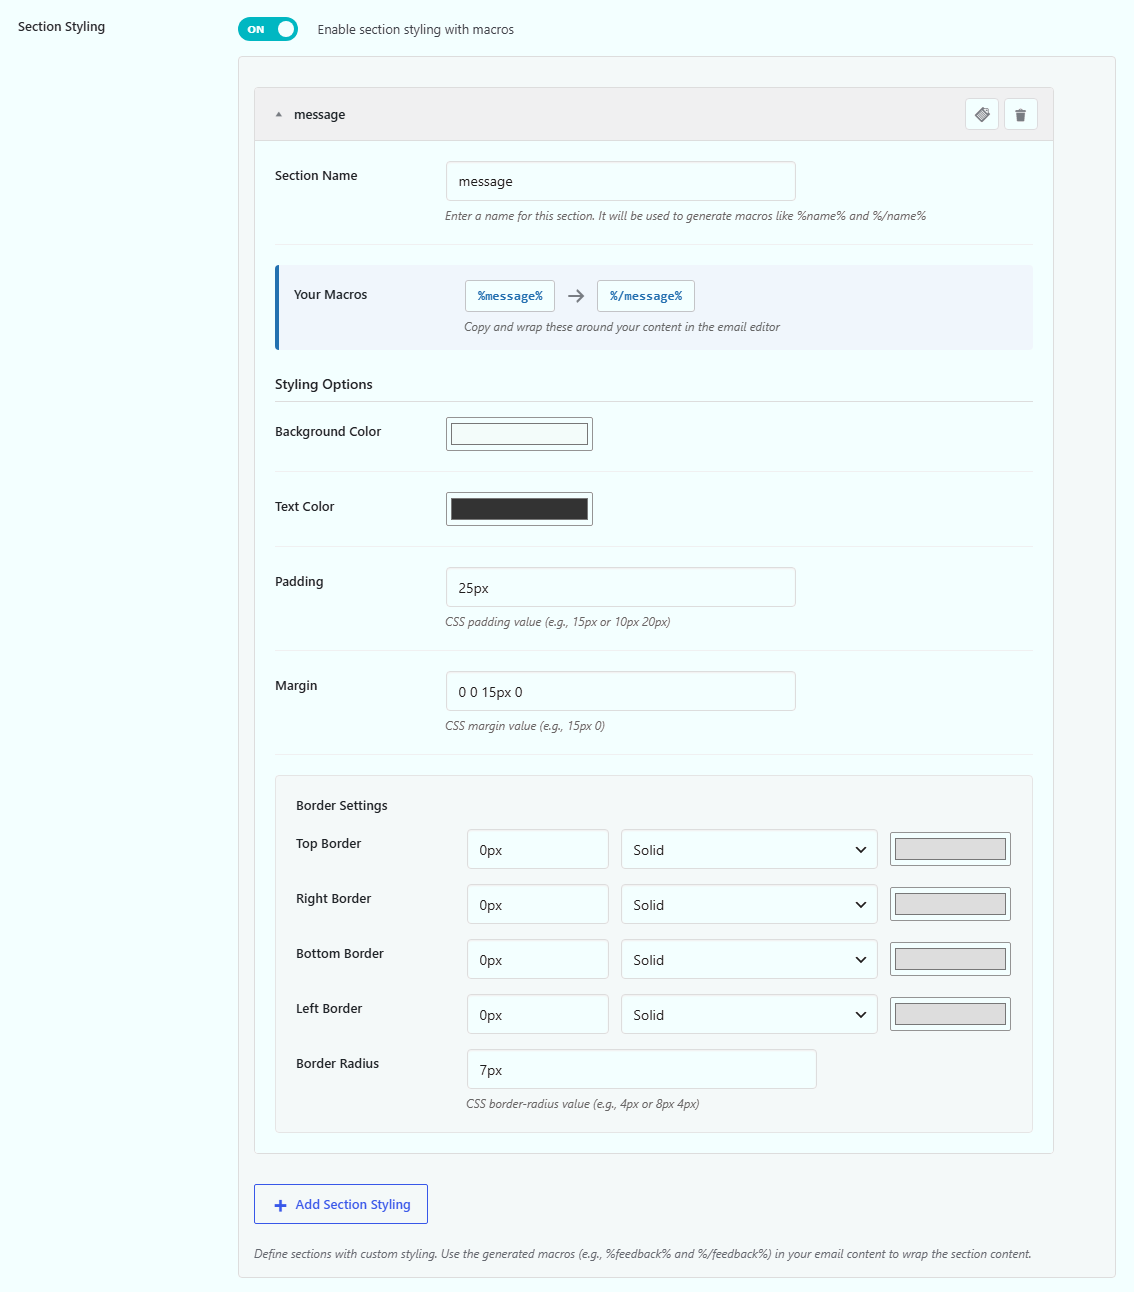
When Section Styling is enabled on a template, each section you create gets an opening and closing macro.
For a section named Feedback, the macros are:
%feedback%
and:
%/feedback%
Anything between those two markers is rendered using that section’s styling.
Example:
%feedback%

Your request has been received.
[button:{post_url:inserted}]View Request[/button]
%/feedback%
The setup itself is covered in Template Styling: Message Boxes, Sections & Buttons.
A practical example #
Suppose a company-registration form contains:
contact_personcompany_namecompany_typesubmission_date
and the company type comes from glossary 84.
You could write:
Subject: Registration received – {company_name}

Hello {contact_person},

We have received the registration for {company_name}.

Company Type: {company_type:glossary|84}
Submitted: {submission_date:date}

Thank you.
The same template works for every submission because the values are replaced when the form is processed.
Quick reference #
| What you need | Syntax |
|---|---|
| Normal form field | {field_name} |
| Glossary label | `{field_name:glossary |
| Manual option label | {field_name:options} |
| Term name | {field_name:term} |
| Date | {field_name:date} |
| Time | {field_name:time} |
| Date and time | {field_name:datetime} |
| Inserted post ID | {post_id:inserted} |
| Inserted post title | {post_title:inserted} |
| Inserted post URL | {post_url:inserted} |
| Inserted post meta | {post_meta:meta_key} |
| Recipient details | recipient:first-name and related recipient placeholders |
| Current user details | currentuser:first-name and related current-user placeholders |
| CCT field | [field_name] |
| Repeater | {repeater_name} |
| Button | [button:URL]Text[/button] |
| Styled section | %section-name% ... %/section-name% |
| Site name | {site_name} |
| Site URL | {site_url} |
| Current date | {current_date} |
| Current time | {current_time} |
If a placeholder is not being replaced #
Check these points first:
- Confirm that the JetFormBuilder form selected in the template is the form being submitted.
- Check the field name in JetFormBuilder and make sure the placeholder uses that exact name.
- Use curly braces for normal form fields and square brackets for CCT fields.
- For glossary placeholders, make sure the glossary ID is correct.
- For
{post_meta:key}, make sure the form has created a post and that the meta key exists on that post. - For current-user placeholders, make sure the submission is being made by a logged-in user.
- For inserted-post placeholders, make sure the form workflow actually produces the inserted post data.
- Use the quick-insert controls where possible instead of typing long placeholders manually.
Where to go next #
For responsive repeater output and repeater sub-field formatting, continue with Repeater Fields in Email Templates.
For message boxes, styled sections, and buttons, see Template Styling: Message Boxes, Sections & Buttons.
For JetEngine CCT values, see CCT Recipients & CCT Placeholders.


