

Every email template needs to know who should receive the email. Nelx JFB Email Templates provides several recipient types so you can use a fixed email address, a user selected in the form, a WordPress role, or data from a JetEngine Custom Content Type.
This guide explains the main recipient options and when to use each one.
Before you start #
Open WordPress Admin → Nelx JFB Email Templates → Form Templates, then open the template you want to configure.
Make sure you have already selected the correct JetFormBuilder form. Form-based recipient fields are only available after a form has been selected.
Choose a Recipient Type #
Under Email Settings, use Recipient Type to choose how recipients will be found.
The available options are:
| Recipient Type | Use it when |
|---|---|
| Standard (Email addresses) | You know the email address, or the form contains an email field |
| User ID Fields | The form contains a WordPress user ID, or you want to enter a user ID manually |
| User Roles | Everyone with one or more WordPress roles should receive the email |
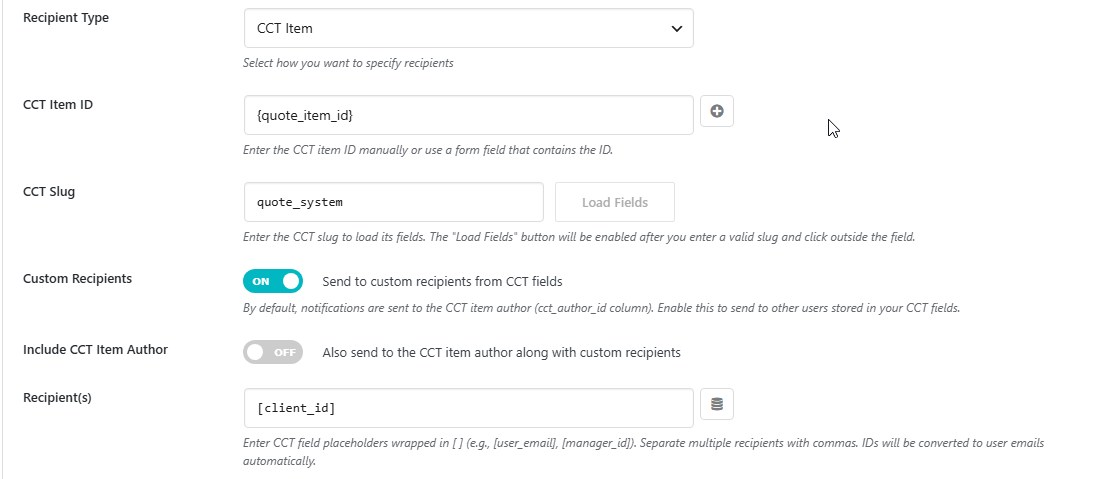
| CCT Item | The recipient should come from a JetEngine Custom Content Type item |
For most confirmation emails, Standard (Email addresses) is the simplest choice.

Standard email addresses #
Choose Standard (Email addresses) when you want to enter email addresses directly.
In Recipient(s), enter one or more addresses separated by commas:
admin@example.com, manager@example.com
You can also use a JetFormBuilder field that contains the recipient’s email address. Click the + button beside the field and choose the form field you want to insert.
For example:
{email}
If the form’s email field contains customer@example.com, that address becomes the recipient when the form is submitted.
You can mix fixed addresses and form fields if needed:
support@example.com, {email}
Multiple recipients #
When Rotation is off and the template resolves to more than one recipient, the email is sent with one address as the primary recipient and the remaining addresses added as BCC recipients.
This means recipients do not see the other BCC addresses.
If you want only one person to receive each submission, use Rotation instead. Rotation is covered in Round-Robin Rotation & Assignment Tracking.
User ID Fields #
Choose User ID Fields when the form stores a WordPress user ID rather than an email address.
This is useful when a form includes fields such as:
assigned_user_idstaff_idmanager_idclient_user_id
After choosing User ID Fields:
- Select a form field that contains the user ID.
- Click Add Field.
- Repeat if more than one field should be used.
The plugin looks up the WordPress user and sends the email to that user’s account email address.

Add a user ID manually #
You can also enter a WordPress user ID directly in Or enter manual IDs, then click Add Manual ID.
This is useful when the recipient is a known user and does not need to come from the form.
User Roles #
Choose User Roles when everyone with a particular WordPress role should receive the email.
Select one or more roles from the list. Hold Ctrl on Windows or Cmd on macOS to select more than one role.
For example, you could send an internal notification to everyone with the support_staff role or to users in both an editor and a custom management role.
Without Rotation, every resolved user receives the email. With Rotation enabled, the recipients can instead be used as a pool from which one user is selected for each submission.
See Round-Robin Rotation & Assignment Tracking before enabling Rotation on a role-based recipient list.
CCT Item recipients #
Choose CCT Item when the recipient depends on a JetEngine Custom Content Type item.
This recipient type can use the CCT author or values stored in CCT fields. It also supports CCT placeholders such as [field_name].
Because CCT recipients require their own item ID, CCT slug, field loading, recipient rules, and placeholder behavior, they are covered separately in CCT Recipients & CCT Placeholders.
If you are not working with a JetEngine CCT, you can ignore this recipient type.
Store Recipient User ID in Post Meta #
The Store Recipient User ID in Post Meta option is useful when the recipient is also the person assigned to a post created or updated by the form.
For example, you may want to save an assigned staff user’s ID in a field such as:
assigned_staff_id
You can then use that field later in listings, queries, dashboards, or other workflow logic.
When you enable this option, configure:
Post ID #
Enter the ID of the post where the recipient user ID should be stored.
If the form creates a new post, use:
{post_id:inserted}
You can insert this using the Post Data button.
Post Meta Field #
Enter the meta key that should store the recipient user ID, for example:
assigned_staff_id
Use this option when the recipient is expected to resolve to a WordPress user. An external email address does not have a WordPress user ID to store.
Also keep in mind that this setting stores one recipient user ID. It is best suited to workflows where one person is being assigned.

If Rotation is enabled #
Do not use Store Recipient User ID in Post Meta for the normal recipient when Rotation is handling the assignment.
Use Store Rotation User in Post Meta instead. That option records the user actually selected by the rotation cycle.
See Round-Robin Rotation & Assignment Tracking for the full setup.
Reply-To is separate from the recipient #
The recipient controls who receives the email. Reply-To controls where a reply to that email should be sent.
You will find Reply-To further down in the same template under the email composition settings.
If Reply-To is left empty, the plugin uses the From Email address.
This means you can send an email to a staff member while directing replies somewhere else, depending on how the template is configured.
Recipient types and advanced routing #
The recipient selected in the main template acts as the default recipient setup.
Other features can change how that recipient setup is used:
- Conditional Recipients can replace the default recipient when a condition matches.
- Rotation can select one person from a group of recipients.
- Smart Recipient can determine the recipient from a conversation between a post author, assignee, and another participant.
- CCT Item can resolve recipients from Custom Content Type data.
You do not need to enable any of these features for a normal email template.
Which recipient type should I use? #
A quick way to decide:
- If you have an email address, use Standard.
- If you have a WordPress user ID, use User ID Fields.
- If a whole role should receive the email, use User Roles.
- If the recipient lives in a JetEngine CCT item, use CCT Item.
- If one user should be selected in turn from a group, add Rotation.
- If the recipient should change based on a form answer, use Conditional Recipients.
Where to go next #
For recipient rules based on submitted values, continue with Conditional Recipients & Routing Rules.
For round-robin assignment, continue with Round-Robin Rotation & Assignment Tracking.
For ticket-style reply routing between users, see Smart Recipient & Conversation Routing.
For CCT-based recipients, see CCT Recipients & CCT Placeholders.


