This guide walks you through creating email templates for your JetFormBuilder forms. Each template sends customized emails when someone submits a form.
Getting Started #
- Go to your WordPress admin panel.
- Navigate to Nelx JFB Email Templates in the left menu.
- Click the “Add New Template” button.

A new template section will open, ready for you to configure.
Step 1: Select Your Form #
At the top of the template, you’ll find the form selector with a searchable dropdown interface.
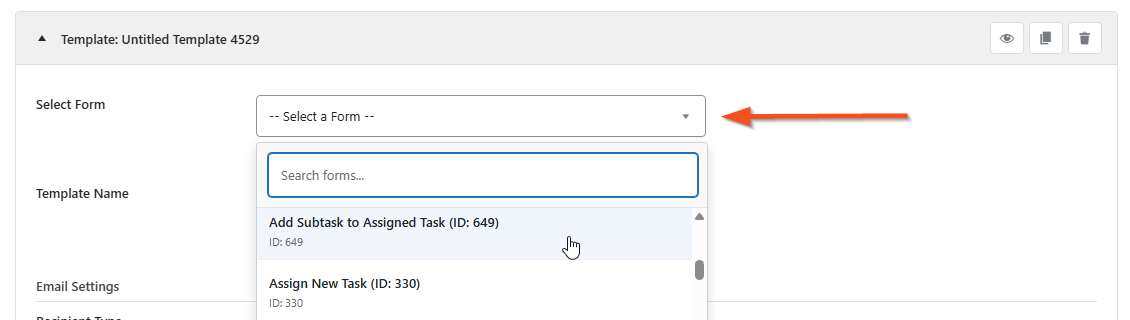
- Click the dropdown and start typing to search for your form, or scroll through the list.
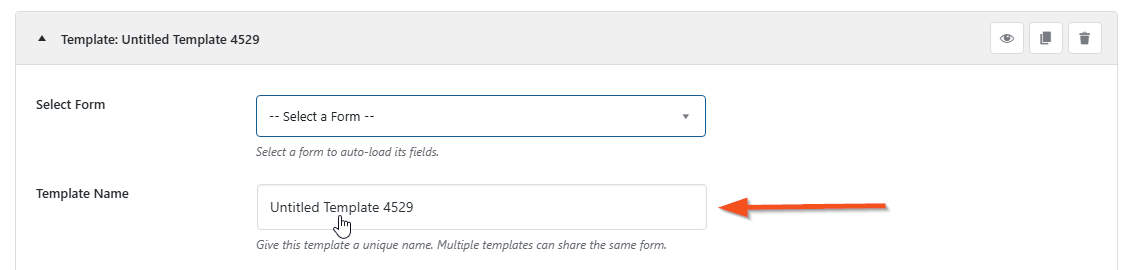
- The template title will automatically show your selected form’s name. However, you must give the template a unique name to avoid conflicts.
- Once selected, all form fields become available for use in your email.
Note: You must select a form first before you can access any form fields in the email settings below.
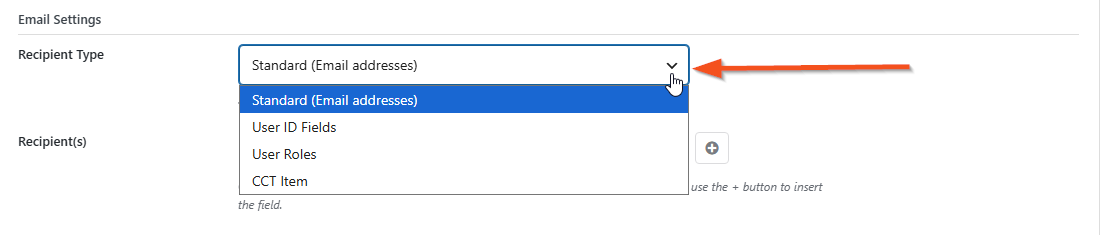
Step 2: Set Up Recipients (Who Gets the Email) #
Recipient Type #
Choose how you want to specify who receives this email:
| Recipient Type | What it means |
|---|---|
| Standard (Email addresses) | Enter email addresses directly. |
| User ID Fields | Use form fields that contain user IDs. |
| User Roles | Send to all users with specific roles. |
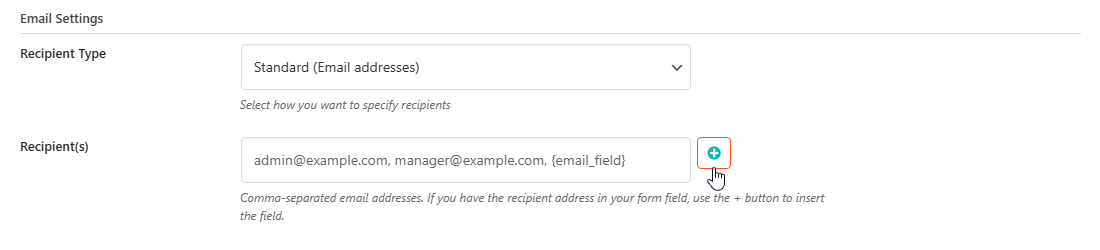
Standard Recipients #
- Enter email addresses separated by commas (e.g.,
admin@example.com, manager@example.com). - You can use the + button to insert form field placeholders like
{email_field}to pull email addresses from the form submission.
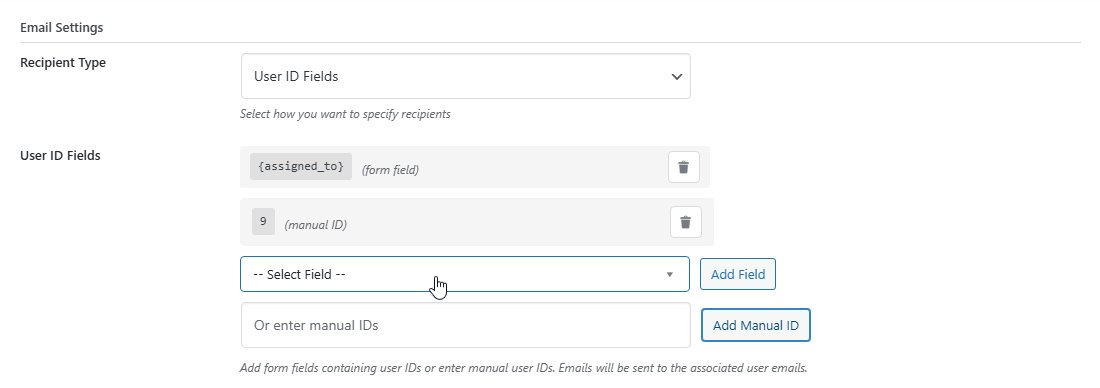
User ID Fields #
- Select form fields that contain user IDs from the dropdown and click “Add Field”.
- Or enter manual user IDs in the text box and click “Add Manual ID”.
- Each added ID will appear as a tag that you can remove if needed.
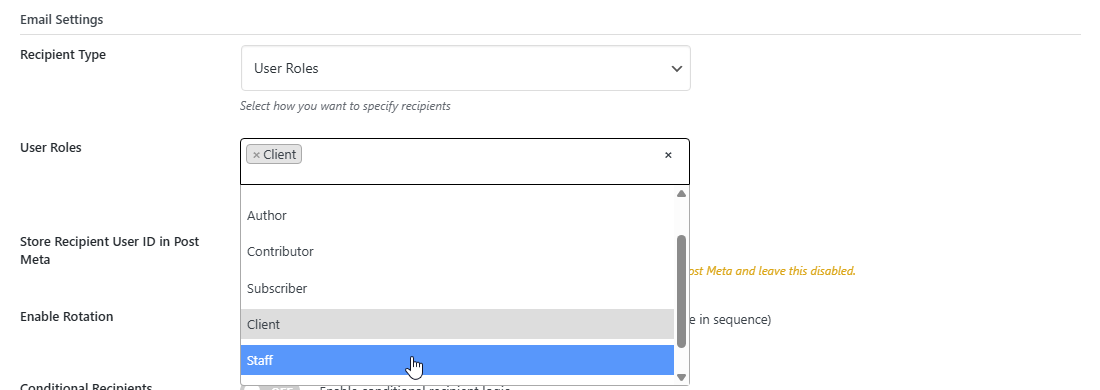
User Roles #
- Hold
Ctrl(orCmdon Mac) to select multiple user roles. - Emails will be sent to all users who have any of the selected roles.
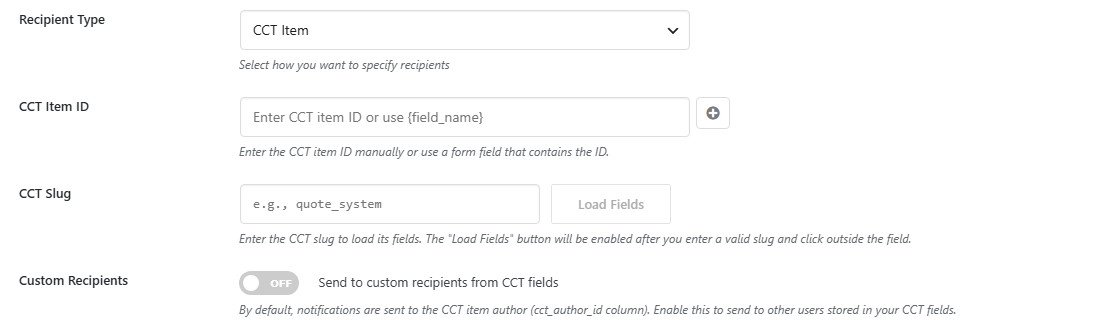
CCT Item (Custom Content Type) #
Send emails to users associated with a CCT item. This is perfect for workflows like quote approvals, invoice notifications, or any system where you need to notify users based on data stored in a JetEngine CCT.
Step 1: Identify the CCT Item #
| Field | Description |
|---|---|
| CCT Item ID | Enter the CCT item ID directly, or use a form field placeholder {field_name} that contains the ID from your form submission. |
Step 2: Select the CCT Type #
| Field | Description |
|---|---|
| CCT Slug | Enter the CCT slug (e.g., quote_system, invoice_system). Then click “Load Fields” to fetch all available fields from that CCT. |
Step 3: Choose Recipients #
By Default — When “Custom Recipients” is OFF:
- Emails are sent to the CCT Item Author (the user who created the CCT item, stored in the
cct_author_idcolumn).
Custom Recipients — When “Custom Recipients” is ON:
| Field | Description |
|---|---|
| Include CCT Item Author | Toggle ON to also include the CCT author along with your custom recipients. |
| Recipient(s) | Enter CCT field placeholders wrapped in [ ] (e.g., [user_email], [manager_id]). Separate multiple recipients with commas. The system automatically converts IDs to user emails. |
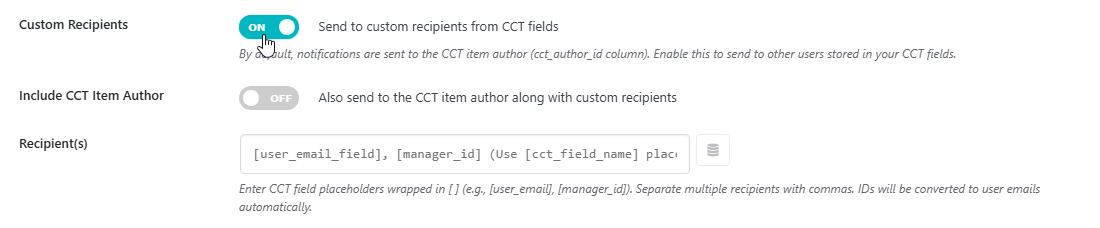
💡 Tip: Use the “Insert CCT Field” button (database icon) to select fields from your loaded CCT. Placeholders will be inserted as
[field_name].
Example Usage:
[client_email], [assigned_staff_id], [approver_email]How CCT Placeholders Work #
CCT placeholders are wrapped in [ ] brackets and can be used anywhere in your email templates:
| Where to Use | Example |
|---|---|
| Recipient(s) field | [client_email], [manager_id] |
| Email Subject | Quote [quote_number] has been updated |
| Email Content | Dear [client_name], your quote [quote_number] expires on [expiry_date:date] |
| Button URL | [button:https://example.com/quote/[quote_number]-{item_id}/]View Quote[/button] |
| Notification Message | Quote [quote_number] requires your attention |
| Notification URL | https://example.com/quote/[quote_number]/ |
Date Formatting for CCT Fields #
Just like form fields, CCT date fields can be formatted using :date, :time, or :datetime suffixes:
| Placeholder | Output |
|---|---|
[expiry_date] | Automatically formatted date (if field name contains date indicators) |
[expiry_date:date] | Formatted date only (e.g., January 15, 2025) |
[expiry_date:time] | Formatted time only (e.g., 2:30 PM) |
[expiry_date:datetime] | Formatted date and time (e.g., January 15, 2025 2:30 PM) |
The system automatically detects Unix timestamps and converts them to your WordPress timezone settings.
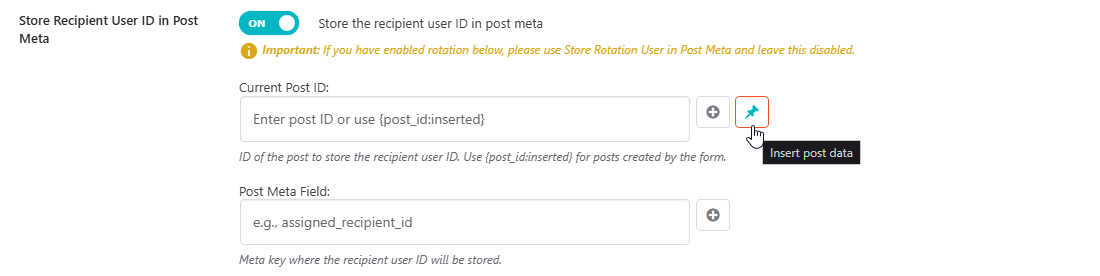
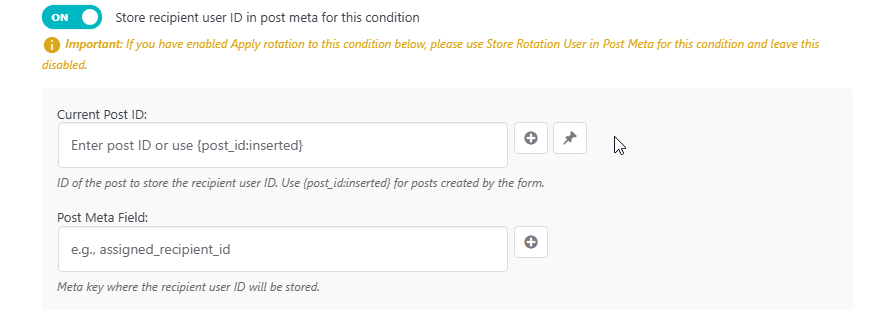
Store Recipient User ID in Post Meta #
Toggle on “Store Recipient User ID in Post Meta” to save the recipient’s user ID directly to a post:
| Field | Description |
|---|---|
| Current Post ID | Post ID to store the recipient ID. Use form placeholder inserted by (insert form field +) button if you have a hidden field in your form that stores current post ID. Use {post_id:inserted} for newly created posts. Insert using the ‘insert post data’ button. |
| Post Meta Field | Meta key name (e.g., assigned_recipient_id, ticket_owner). Use the insert form field button if you have this as a hidden field in your form or paste it directly from your CPT. |
Important:
- If you have enabled rotation, use “Store Rotation User in Post Meta” (Step 3) instead and leave this disabled.
- This feature only works with one recipient at a time, this means you should only enable it if you only have one recipient in your recipient type (whether it’s standard, user ID, or User Role).
Important Note About Multiple Recipients #
- When Rotation is disabled, emails are sent using BCC (Blind Carbon Copy) to protect recipient privacy — no one can see who else received the email.
- When Rotation is enabled, only one recipient receives the email (the next in the rotation cycle).
Store Recipient User ID Use Case #
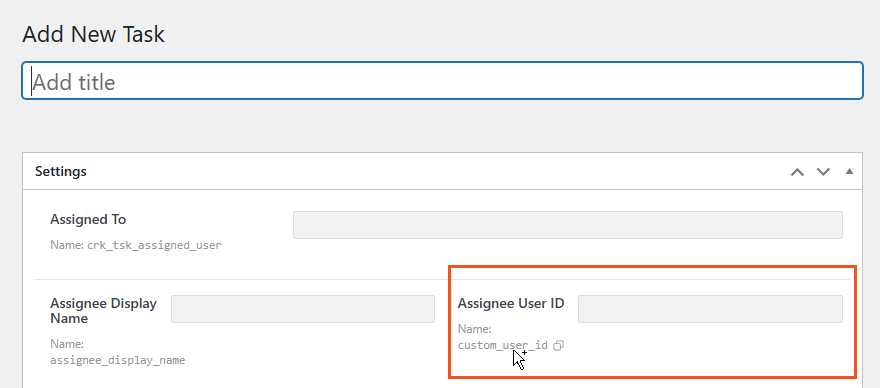
You want to use this feature if you need to use the recipient ID later in your workflow, say, if you plan or have a listing that lists post types based on assigned recipient.
For instance, if you have a task system, and each task is assigned to a staff member, you want your listing to only show tasks assigned to a specific staff. You need a meta field to store the ID like in the screenshot below.
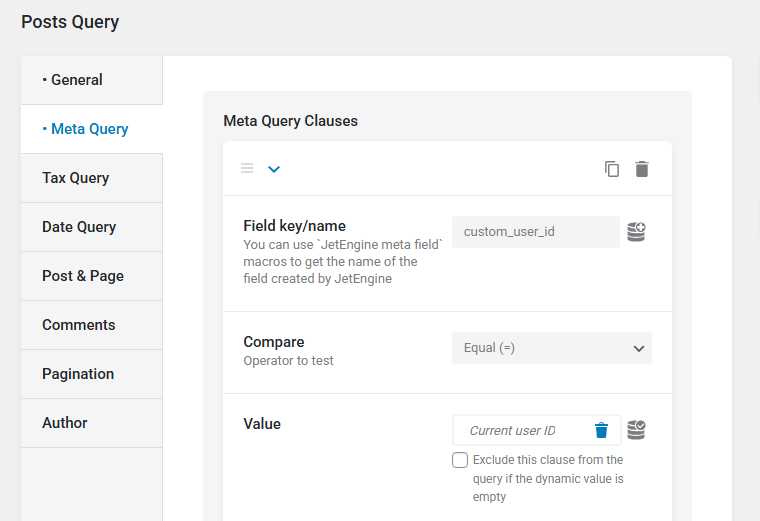
In this case, when you create a query that fetches the posts (your tasks post type), you’ll add a meta query for user ID such that the meta field in your CPT that stored the ID is compared to the current user. Below is an example query setup screenshot.
Step 3: Enable Rotation (Round-Robin Assignment) #
Turn on “Enable Rotation” to distribute form submissions evenly among your team members.
How Rotation Works #
- Each form submission is sent to one user at a time in sequence.
- The system tracks who received which submission.
- Perfect for support tickets, lead distribution, or task assignments.
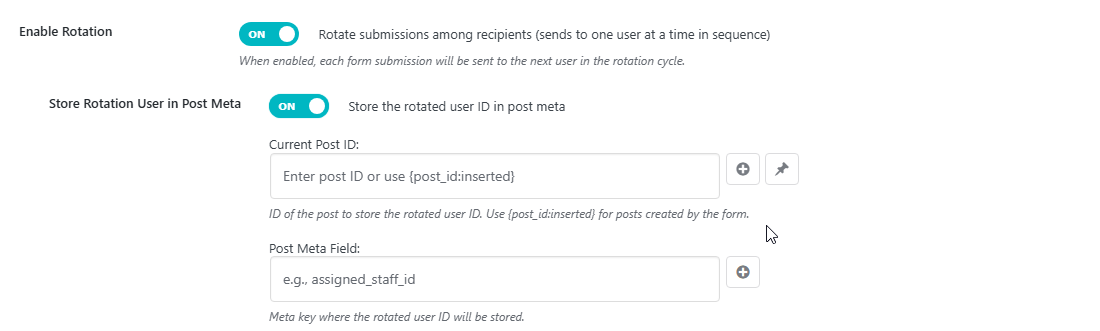
Store Rotation User in Post Meta #
When rotation is enabled, you can store the assigned user ID in post meta for listings (as explained above) or tracking and reporting:
- Toggle on “Store Rotation User in Post Meta”.
- Current Post ID — Enter the post ID where the user ID should be stored. Use
{post_id:inserted}for posts created by the form. - Post Meta Field— Enter the meta key name (e.g.,
assigned_staff_id, ticket_owner, lead_assignee).
Example: If you have a support ticket system, you can store the assigned staff member’s ID in ticket_assigned_staff_id post meta for later reference in listings, reports, or conditional logic.
Step 4: Conditional Recipients (Advanced) #
Turn on “Conditional Recipient Logic” to send emails to different people based on form answers.

How It Works #
You can set rules such as: If the user selects “Sales”, send the email to sales@company.com. If they select “Support”, send it to support@company.com.
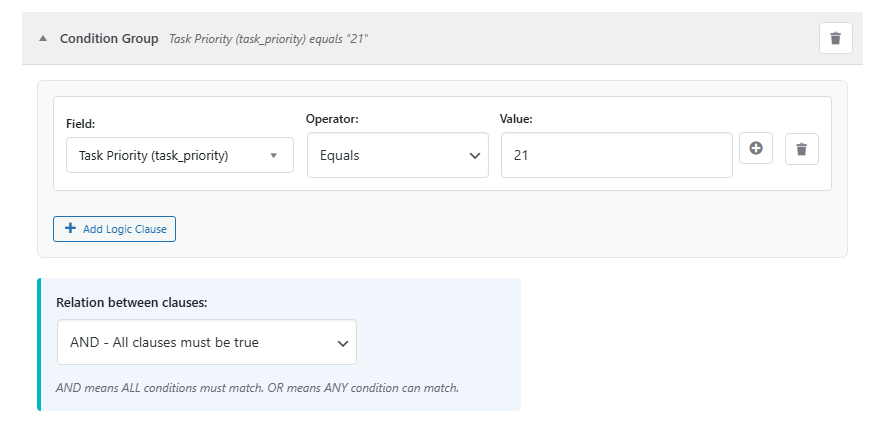
Creating a Condition #
Click “Add Recipient Condition” and set up:
- Field — Select which form field to check (e.g., a dropdown menu or radio button).
- Operator — Choose the condition type.
- Value — Enter the value to compare against (or leave blank for empty checks).
Supported operators:
- Equals / Not Equals
- Contains / Not Contains
- Starts With / Ends With
- Is Empty / Is Not Empty
Multiple Logic Clauses (AND/OR Groups) #
Each condition can have multiple logic clauses with AND/OR relations:
- AND — All clauses must be true for the condition to match.
- OR — Any clause can be true for the condition to match.
Click “Add Logic Clause” within a condition to add multiple field checks.
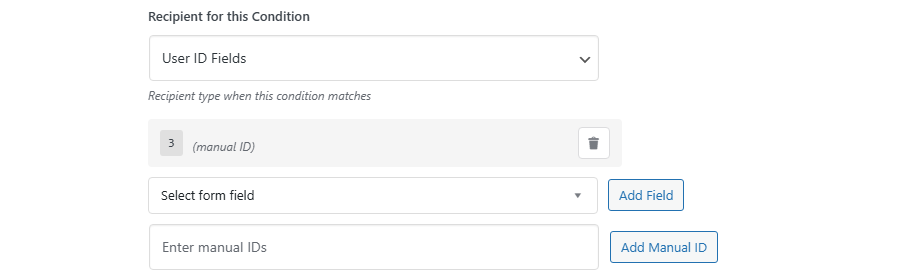
Setting Recipients for the Condition #
- Below each condition, set the “Recipient for this Condition” just like Step 2.
- Choose the recipient type (Standard, User ID Fields, User Roles, or CCT Item).
Store Conditional User ID in Post Meta #
This is similar to the explanation we provided in step 2 above. Please refer to it.
Rotation Within Conditions #
- Each condition can have its own rotation settings.
- Toggle on “Apply rotation to this condition” to rotate submissions among recipients that match this specific condition.
- When enabled, you can also store the rotated user ID in post meta for this condition separately.

Example: Support tickets with priority levels:
- High Priority → Rotate among senior support staff, store assignee in
high_priority_assigneemeta field - Medium Priority → Rotate among regular support staff, store assignee in
medium_priority_assigneemeta field - Low Priority → Send to all support staff (no rotation)
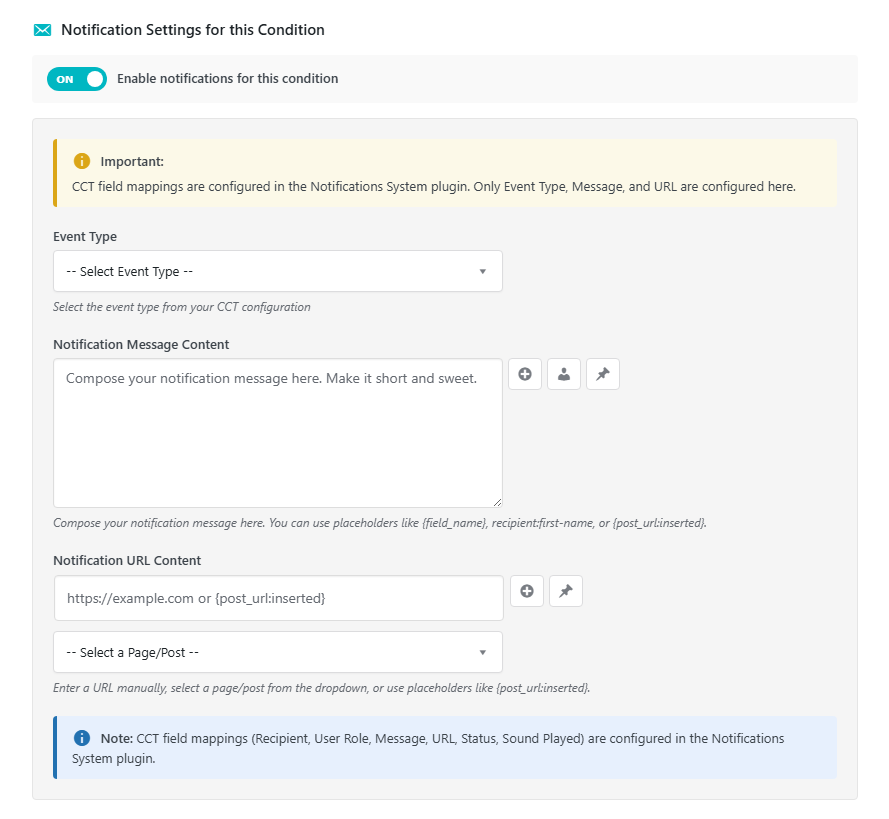
Notifications for Conditions (only available if you have the Nelx Notification System Plugin) #
Each condition can have its own notification settings:
- Toggle “Enable notifications for this condition” to create notifications only when this condition matches.
- Configure Event Type, Message, and URL separately for each condition.
Important Notes #
- The first matching condition (top to bottom) determines who gets the email.
- If no conditions match, the email goes to the default recipients you set in Step 2.
- Smart Recipient and Conditional Recipients cannot be used together — enabling one will automatically disable the other with a notice explaining why.
- It’s not mandatory to store assignee IDs in different meta fields as in the example above. In fact, we recommend using only one meta field.
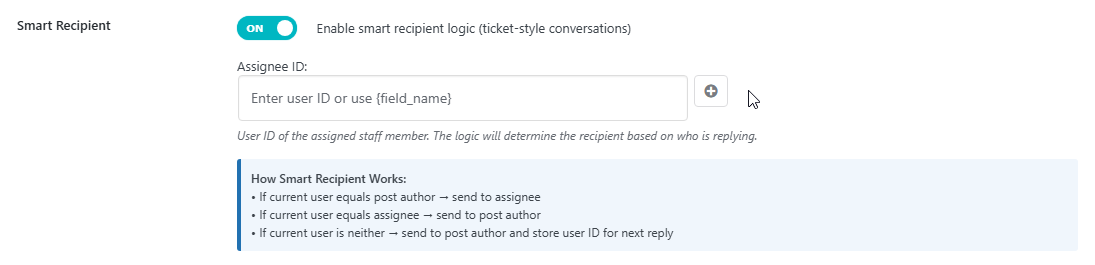
Step 5: Smart Recipient (Ticket-Style Conversations) #
Turn on “Smart Recipient” for intelligent conversation routing — perfect for support tickets, task discussions, or any multi-party communication.
How Smart Recipient Works #
| Scenario | Recipient |
|---|---|
| Current user = Post Author (e.g., client replying) | Send to Assignee |
| Current user = Assignee (e.g., staff replying) | Send to Post Author |
| Current user = Neither (third party replying) | Send to Post Author + store third party ID for next reply |
Setting Up Smart Recipient #
- Toggle on “Enable Smart Recipient”.
- Assignee ID — Enter the user ID of the assigned staff member. You can use form field placeholders like
{assigned_staff_id}if the assignee is selected in the form or is in a hidden field.
Third Party Participant Tracking #
- When someone who is neither the post author nor the assignee replies, the email is sent to the post author.
- The third party’s user ID is stored in a post meta internally.
- On the next reply, the system checks this stored ID to include them in the conversation.
Important Notes #
- Requires assignee ID — Smart Recipient needs assignee ID to work with for determining who the task/ticket/request was assigned to or who the message was sent to.
- Mutually exclusive — Cannot be used with ConditionalStep 6: Connect Relation (JetAppointments Integration)
- Perfect for support ticket systems, task discussions, and project management workflows.
Step 6: Connect Relation (JetAppointments Integration) #
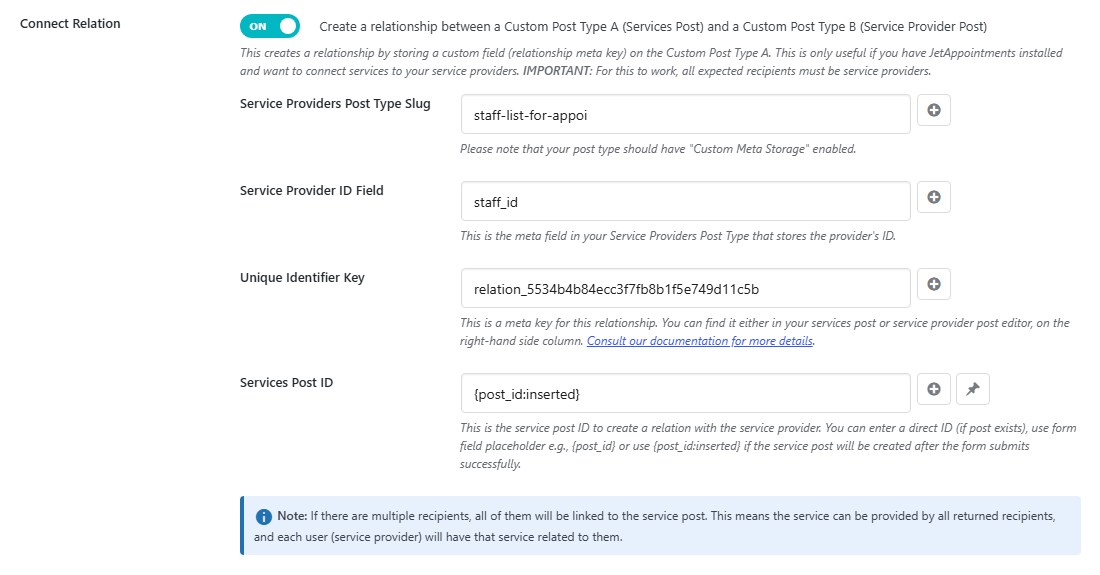
Turn on “Connect Relation” to create relationships between a Custom Post Type A (Services Post) and a Custom Post Type B (Service Provider Post) by storing a custom field (relationship meta key) on the Custom Post Type A.
Important: For this to work, all expected recipients must be service providers. This feature is only useful if you have JetAppointments installed and want to connect services to your service providers.
How Connect Relation Works #
When a form is submitted and this feature is enabled, the system will:
- Look up each recipient (service provider) in your provider meta table
- Find their corresponding staff post ID
- Create a custom field on the service post that links to the staff post
This creates a bidirectional relationship where:
- One service can be provided by multiple service providers
- Each service provider will have that service related to them
Setting Up Connect Relation #
Toggle on “Connect Relation” — This reveals the configuration fields below.
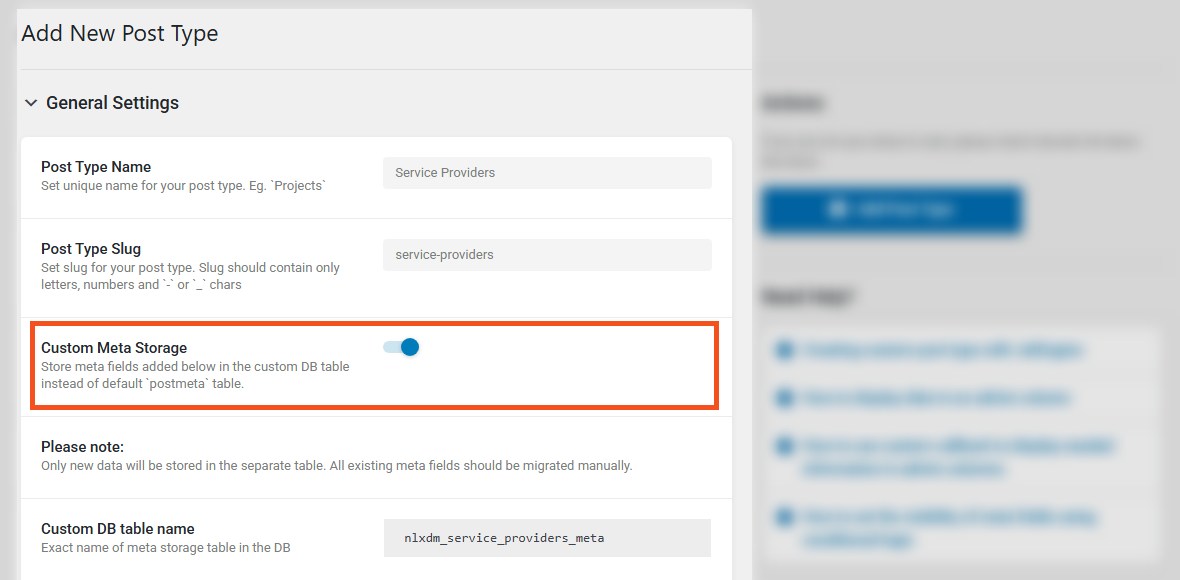
Service Providers Post Type Slug — Enter the slug of your service providers post type (e.g., service-providers). Note: Your post type must have “Custom Meta Storage” enabled.
Service Provider ID Field — Enter the meta field in your Service Providers Post Type that stores the provider’s ID (e.g., staff_id, provider_id, user_id).
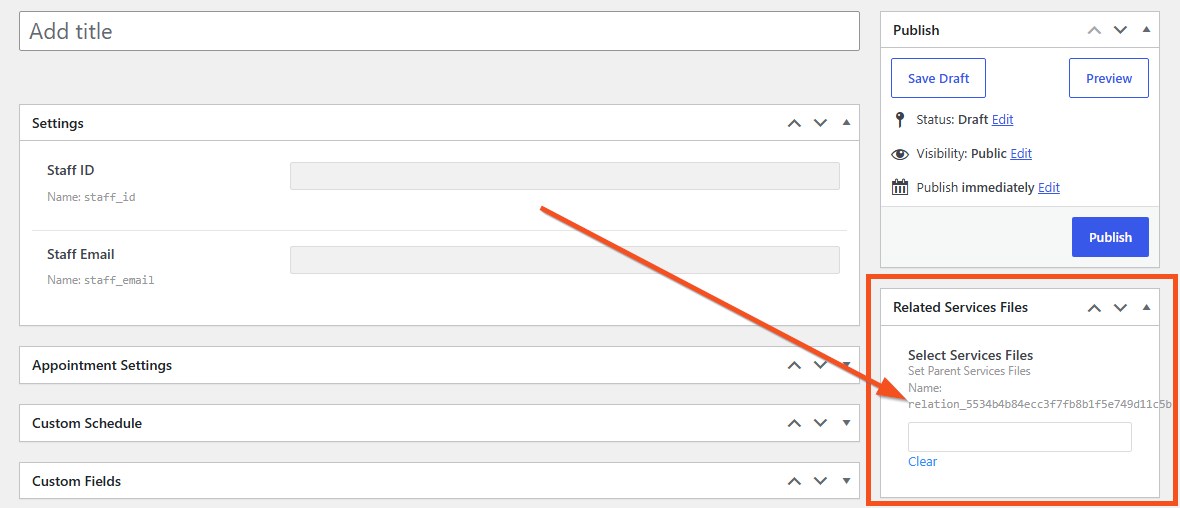
Unique Identifier Key — Enter the meta key for this relationship
(e.g., relation_5534b4b84ecc3f7fb8b1f5e749d11c5b).You can find this key either in your services post or service provider post editor, on the right-hand side column, labelled “Related Service Providers” or “Related Services”.
First, you MUST set your set your services post type and provider post type in JetEppointments general settings.
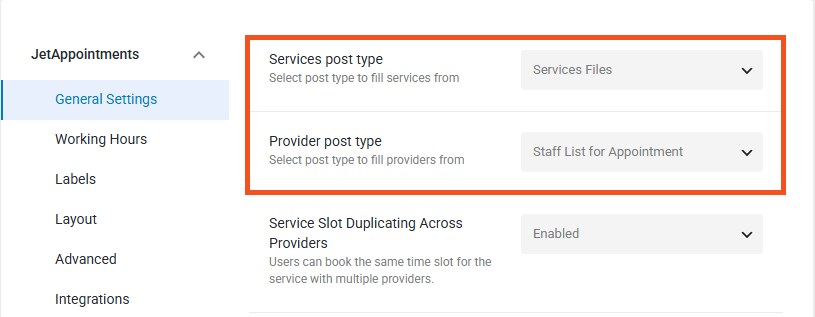
Once that’s done, when you open either of the posts, you should find the key as shown in the screenshot below:
Services Post ID — Enter the service post ID to create a relation with the service provider.
- Enter a direct ID (if the post already exists)
- Use form field placeholder e.g.,
{post_id}if you have a field that stores/captures the current post ID - Use
{post_id:inserted}if the service post will be created after the form submits successfully
How the Table Query Works #
The system constructs the table name using this pattern:{database_prefix}{provider_slug}_meta
Example: If your provider slug is staff_list_for_appoi, the table becomes nlxdm_staff_list_for_appoi_meta
Hyphen Handling: If your slug contains hyphens (e.g., staff-list-for-appoi), they are automatically converted to underscores (staff_list_for_appoi) to match WordPress table naming conventions.
The system then queries this table to find records where your specified Provider ID Field matches the recipient’s user ID, and retrieves the object_ID (staff post ID).
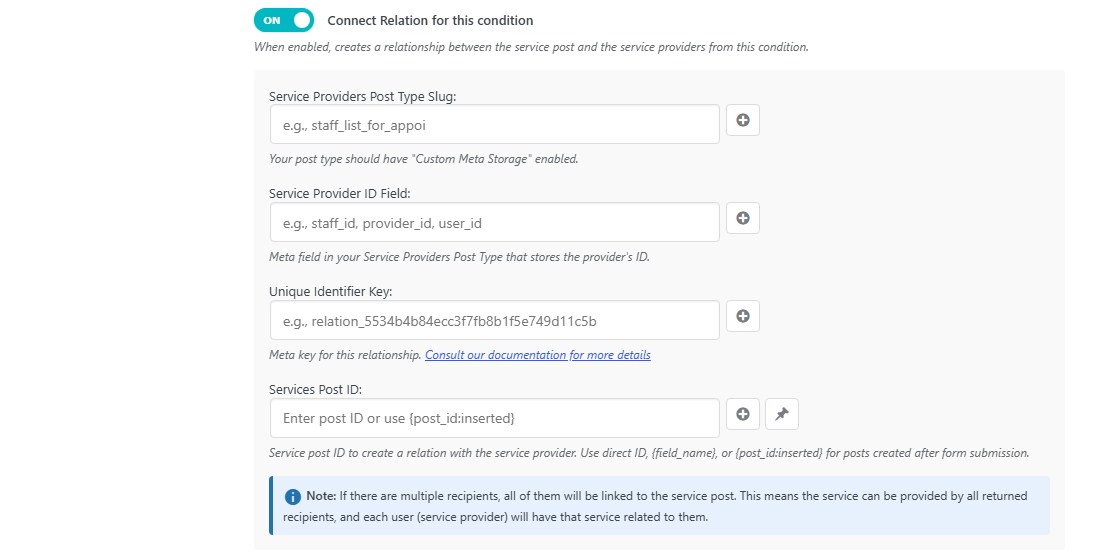
Connect Relation in Conditional Recipients #
You can also enable Connect Relation within each condition by toggling “Connect Relation for this condition”. This allows you to:
- Create different relationships based on condition logic
- Link to different service post IDs depending on form answers
- Have separate relation settings for different recipient groups
Important Notes #
- All recipients must be service providers — The feature only works if every recipient has a corresponding record in your provider meta table.
- Multiple recipients — If multiple recipients match (e.g., from user roles or rotation disabled), ALL of them will be linked to the service post.
- Silent failure — If a recipient doesn’t have a matching staff post record, they are skipped without breaking the form submission.
- Works with rotation — If rotation is enabled and only one recipient is selected, only that one provider will be linked.
Example Use Case #
Service Request Form:
- User submits a request for “IT Support” service
- The form assigns the request to the next available IT staff member (using rotation)
- Connect Relation creates a relationship between the service request post and the assigned staff member’s staff post
- In JetAppointments, you can now see which staff member is associated with this service request
Technical Details #
The relationship is stored as post meta on the service post using your specified Unique Identifier Key. The value stored is the staff post ID from your service providers post type.
Step 7: Compose Your Email #
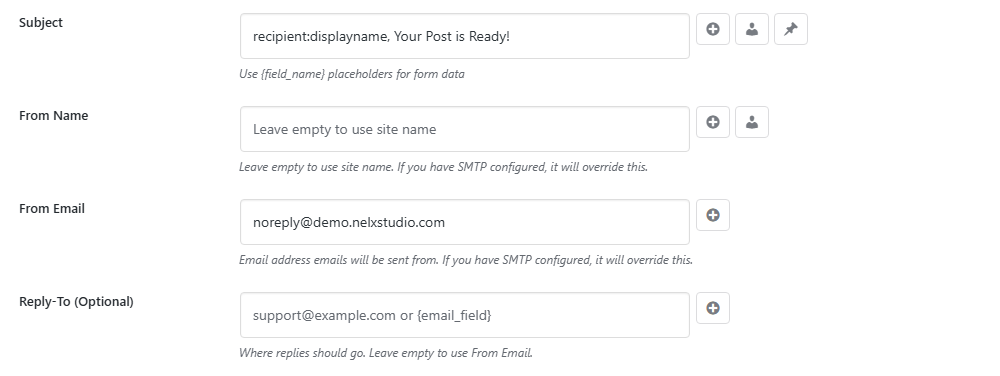
Email Settings Fields #
| Field | Description |
|---|---|
| Subject | Email subject line. Supports all placeholders. |
| From Name | Name shown as the sender. Leave empty to use site name. |
| From Email | Email address shown as the sender. |
| Reply-To (Optional) | Where replies should go. Leave empty to use From Email. |
| Email Content | The main email body. Supports HTML, placeholders, button macros, and section macros. |
Understanding Special Placeholders and Macros #
Before writing your email, understand the different types of placeholders you can use.
1. Form Field Placeholders (Basic values from your form data)

| Placeholder | What it does |
|---|---|
{first_name} | Shows the value from the “first_name” field |
{email} | Shows the value from the “email” field |
{message} | Shows the value from the “message” field |
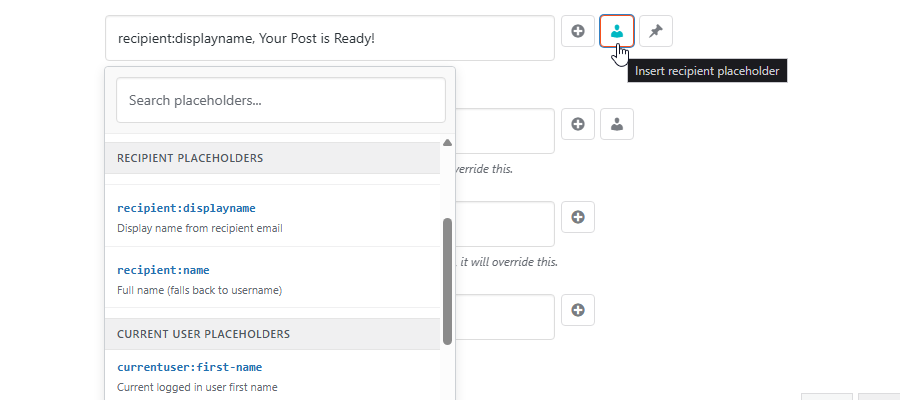
2. Recipient Placeholders (No Curly Braces)
These pull information from the email address receiving the email:
| Placeholder | What it does |
|---|---|
recipient:first-name | Extracts first name from recipient email |
recipient:last-name | Extracts last name from recipient email |
recipient:username | Extracts username from recipient email |
recipient:displayname | Extracts display name if available |
recipient:name | Extracts full name (falls back to username) |
3. Current User Placeholders (No Curly Braces)
These pull information from the currently logged-in user submitting the form:
| Placeholder | What it does |
|---|---|
currentuser:first-name | Current user’s first name |
currentuser:last-name | Current user’s last name |
currentuser:displayname | Current user’s display name |
currentuser:username | Current user’s username |
currentuser:name | Current user’s full name |
4. Inserted Post Data (With Curly Braces)
When your form creates a post, these pull data from the newly created post:
| Placeholder | What it does |
|---|---|
{post_id:inserted} | The ID of the newly created post |
{post_title:inserted} | The title of the newly created post |
{post_url:inserted} | The full URL to view the post |
{post_meta:key} | Retrieves custom meta value from the inserted post |

5. Post Meta Placeholder Example (special case)
{post_meta:assigned_staff_id}
This retrieves a custom field value from the post created by the form. This is useful in situations where the ID or any other value is only available after the post creation.
For example, you might be using a webhook to determine/assign a user based on external factors defined elsewhere only after a post has been created. Your webhook inserts the assignee ID in a defined meta field in your CPT. The post meta placeholder (post_meta:your-defined_meta_field) will retrieve this ID and use it to send the email to that user.
6. Select/Radio/Checkbox Field Placeholders #
For fields with options (select, radio, checkbox), use these specialized placeholders to display user-friendly labels instead of raw values:
| Placeholder | When to use | What it does | Example |
|---|---|---|---|
{field_name:glossary|id} | Options fetched from a Glossary | Shows the glossary label for the selected value | {company_type:glossary|84} displays “Private Limited” instead of “private_limited” |
{field_name:options} | Manual options (entered directly in field settings) | Humanizes the option value (converts underscores/hyphens to spaces, capitalizes words, preserves acronyms) | {company_type:options} displays “Private Limited” instead of “private_limited” |
Why use these?
Without these placeholders, your email might show raw values like private_limited, provision_of_initial_sec_matters, or reg_of_ip_trademarks_copyrights.With glossary placeholder: You get perfect labels from your glossary definitions.
With options placeholder: You get clean, readable labels like:
private_limited→Private Limitedceo_approval→CEO Approvalhr_department→HR Departmentpdf_file_upload→PDF File Uploadapi_integration→API Integration
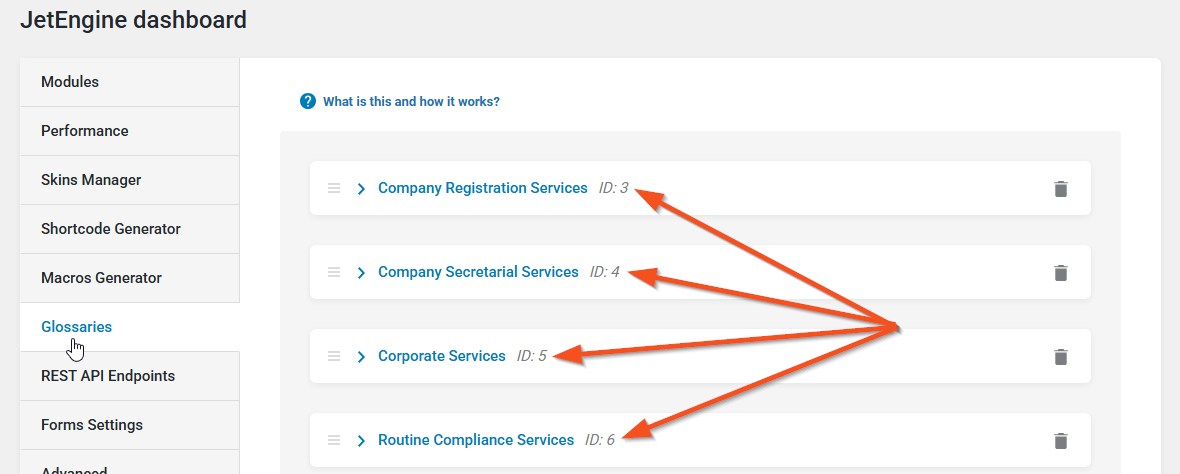
How to find the glossary ID: Go to JetEngine dashboard – Glossaries, and look in the glossary list table.
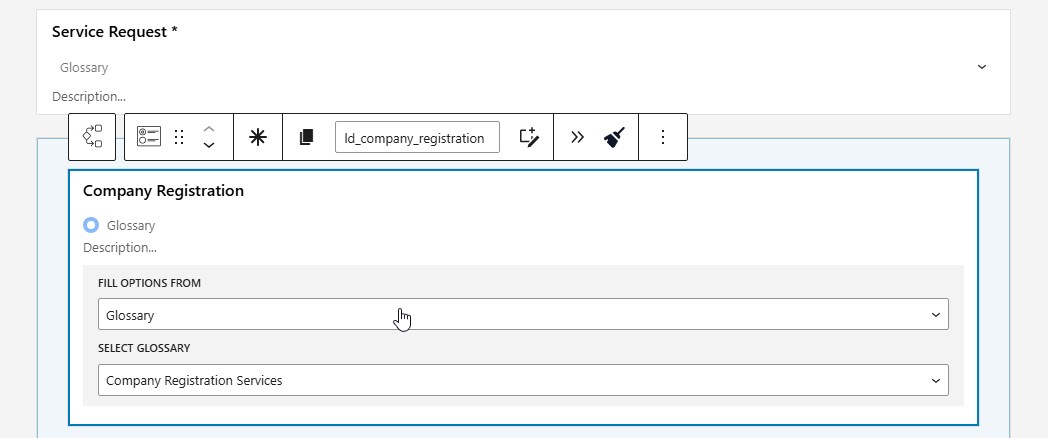
Example radio field in JetFormBuilder Form.
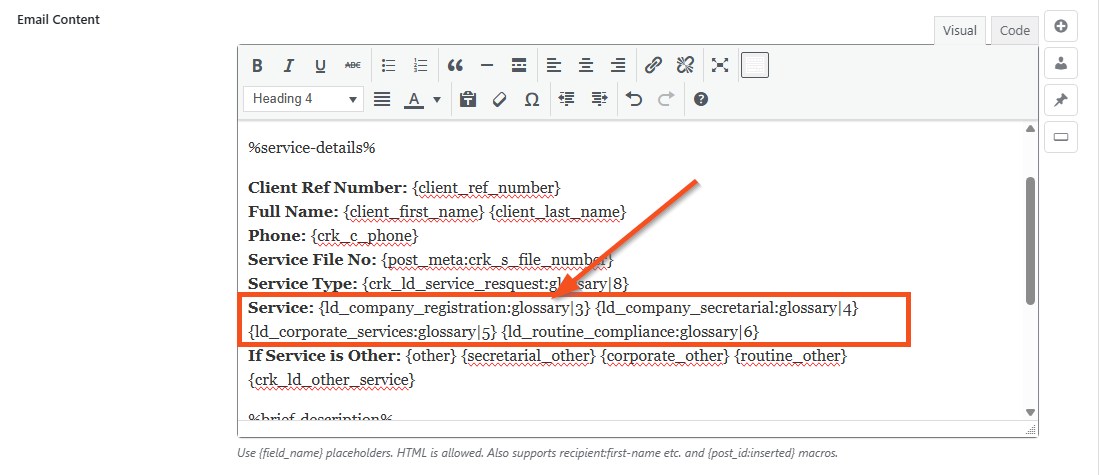
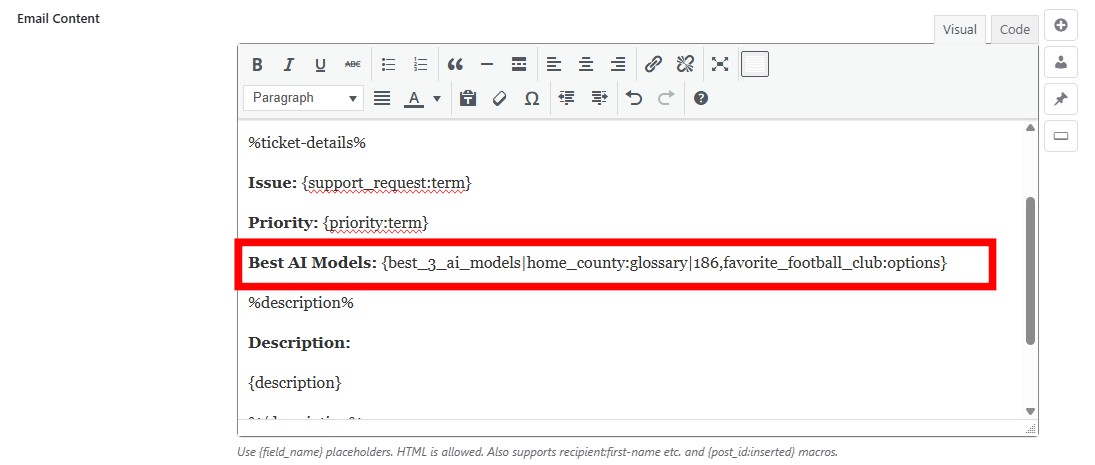
Example usage in Nelx JFB Email Template Content:
Best Practice: Always use glossary placeholders for fields with options fetched from glossaries. For manual options, use the :options placeholder. We highly recommend creating glossaries for your options. If you can’t do that, then make sure your manual option values are reasonable.
7. Date/Time Formatting
| Placeholder | What it does | Example Output |
|---|---|---|
{date_field:date} | Formats as full date | March 1, 2026 |
{time_field:time} | Formats as time | 3:45 pm |
{datetime_field:datetime} | Formats as date and time | March 1, 2026 3:45 pm |
Automatic formatting: If your field name contains “date” or “time” (like “submission_date” or “start_time”), it will automatically format when using just {field_name}.
8. Term Labels
When you have a select field with its options fetched from terms, you need to add term to your field like this {field_name:term}
| Placeholder | What it does |
|---|---|
{field_name:term} | Shows the term label instead of the ID |
9. System Placeholders
| Placeholder | What it does |
|---|---|
{site_name} | Your WordPress site name |
{site_url} | Your WordPress home URL |
{current_date} | Current date in WordPress date format |
{current_time} | Current time in WordPress time format |
[year] or {year} | Current year (for footer text) |
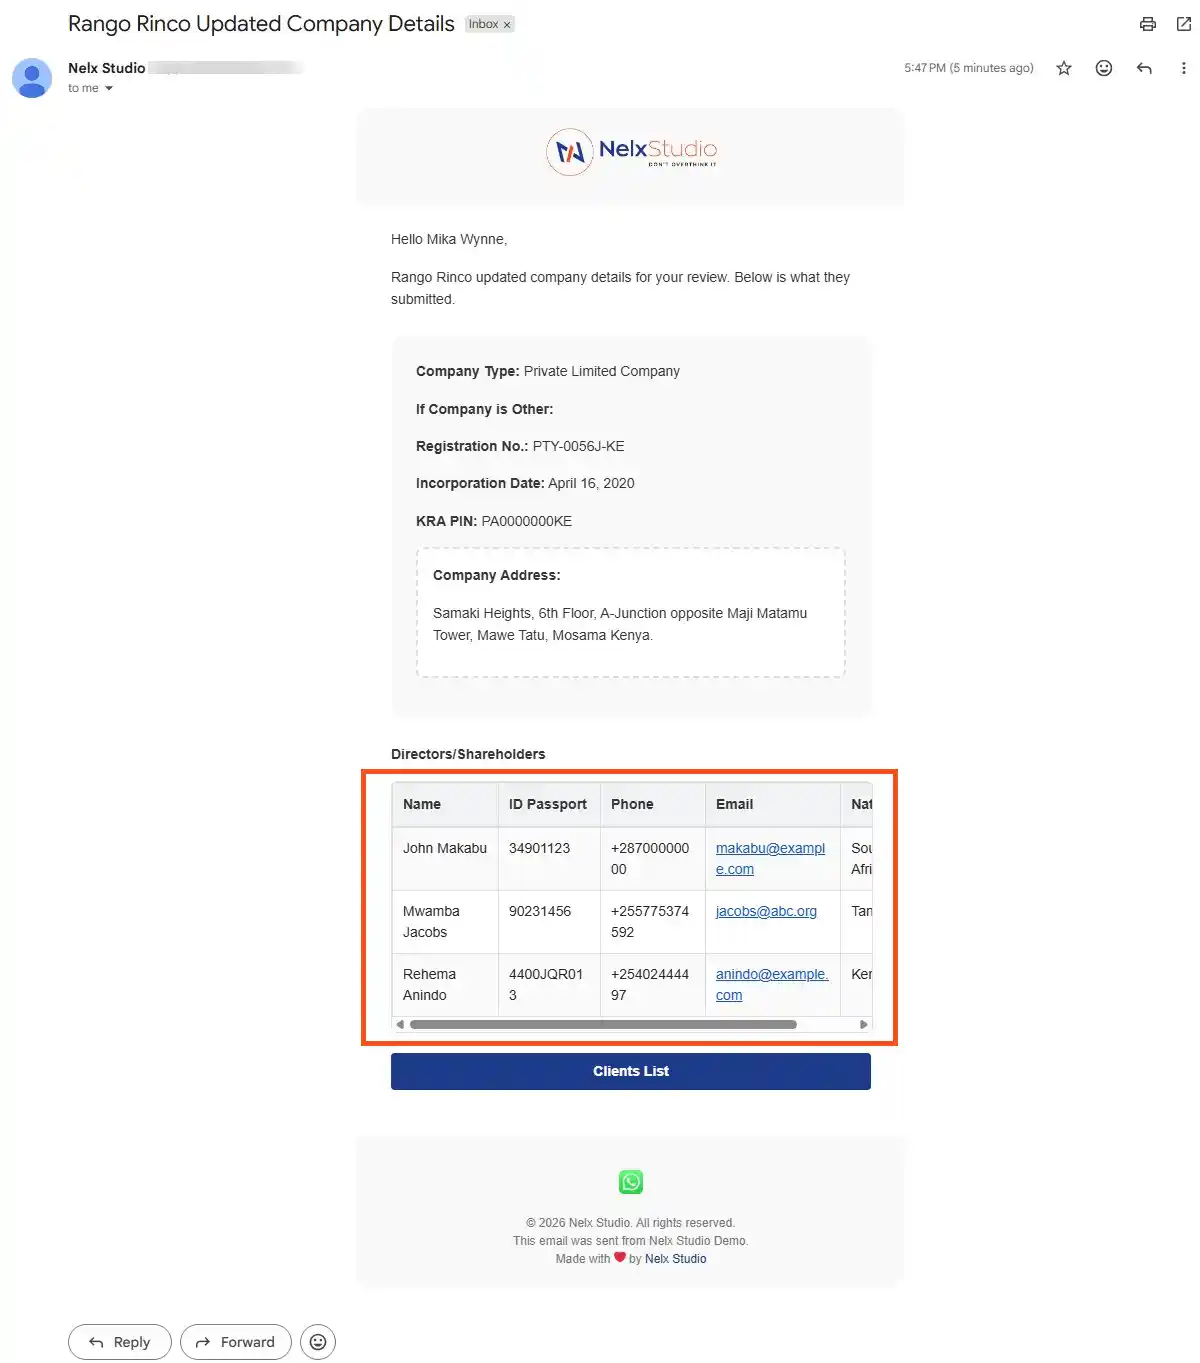
Repeater Fields – Table & Card Display #
When your form contains repeater fields, they are automatically formatted for email display with two responsive layouts:
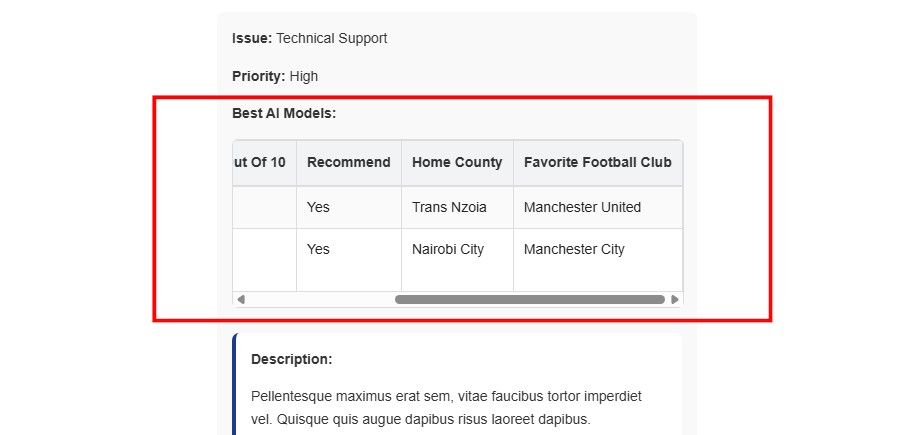
Desktop/Tablet Layout (Screen width > 600px) #
- Table format with column headers
- Horizontal scroll on narrow screens (prevents layout breaking)
- Sticky headers for long tables
- Alternating row colors for better readability
- Shows ALL repeater columns/fields
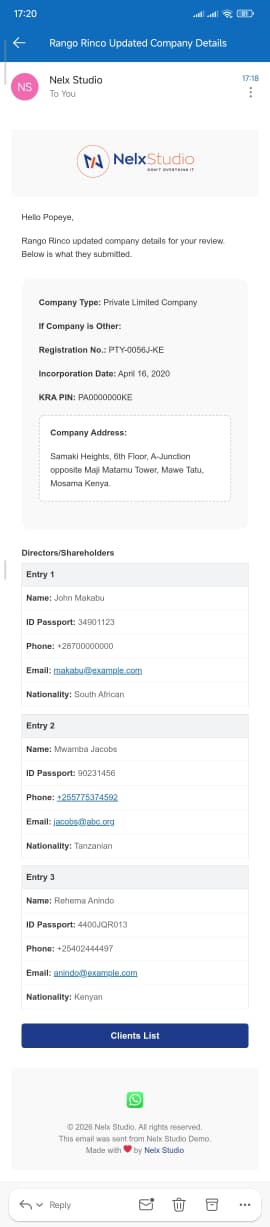
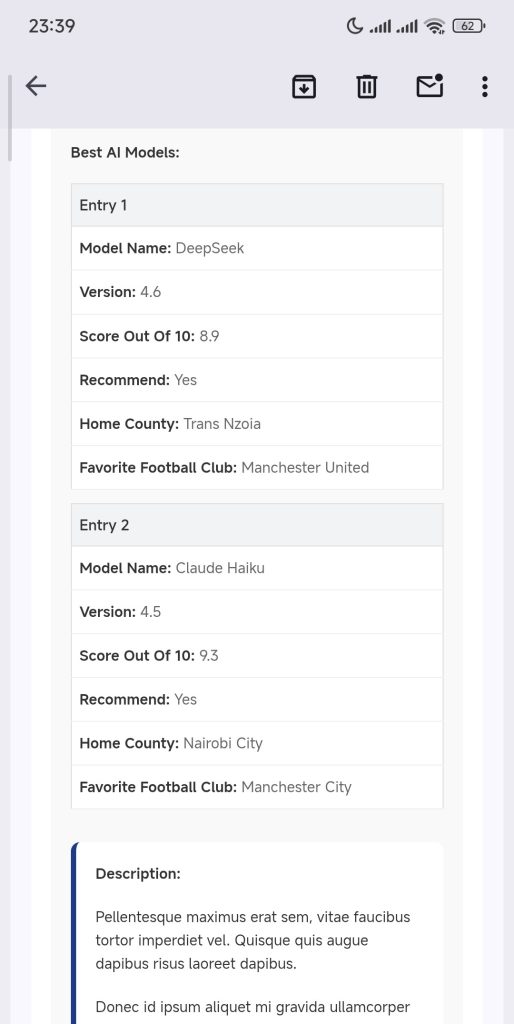
Mobile Layout (Screen width ≤ 600px) #
- Card format – each repeater entry becomes a separate card
- Each card shows ALL field labels with their values stacked vertically
- Perfect for smartphone email clients
- Shows ALL repeater fields (same data as desktop, just different layout)
What makes this special: Most email clients break tables on mobile. This dual-layout approach ensures your repeater data is always readable – tables on desktop, cards on mobile. Both layouts display the exact same data, just formatted differently for optimal viewing on each device.
Repeater Field with Sub-field Processing #
For repeater fields that contain select/radio/checkbox sub-fields, you can specify how each sub-field should be processed using this syntax:
{repeater_name|subfield1:glossary|id,subfield2:options,subfield3:glossary|99}Syntax breakdown:
repeater_name– The name of your repeater field|– Separator between field name and configurationsubfield1:glossary|id– Process subfield1 using glossary IDsubfield2:options– Process subfield2 using manual options humanizationsubfield3:glossary|99– Process subfield3 using glossary ID 99
Important: Only the subfields you specify in the configuration are processed. All other subfields show their raw values. However, ALL subfields are displayed in both desktop and mobile layouts.
Example:
{footballer|nationality:glossary|55,clubs:options,trophies:options}This repeater has 5 subfields: Nationality, Clubs, Trophies, Age, and Favorite Meal. The configuration:
nationality– Process using glossary ID 55 (e.g., shows “Kenyan” instead of “ke”)clubs– Process using manual options humanization (e.g., “Manchester United” instead of “manchester_united”)trophies– Process using manual options humanization (e.g., “Premier League” instead of “premier_league”)age– No configuration, shows raw value (e.g., “25”)favorite_meal– No configuration, shows raw value (e.g., “pizza”)
Example output in email:
On Desktop (ALL fields shown in table format):
| Nationality | Clubs | Trophies | Age | Favorite Meal |
|---|---|---|---|---|
| Kenyan | Manchester United | Premier League | 25 | Pizza |
| Chinese | Real Madrid | Champions League | 28 | Dumplings |
See example screenshot below:
On Mobile (ALL fields shown in card format):
┌─────────────────────────────────┐
│ Entry 1                         │
├─────────────────────────────────┤
│ Nationality: Kenyan             │
│ Clubs: Manchester United        │
│ Trophies: Premier League        │
│ Age: 25                         │
│ Favorite Meal: Pizza            │
└─────────────────────────────────┘

┌─────────────────────────────────┐
│ Entry 2                         │
├─────────────────────────────────┤
│ Nationality: Chinese            │
│ Clubs: Real Madrid              │
│ Trophies: Champions League      │
│ Age: 28                         │
│ Favorite Meal: Dumplings        │
└─────────────────────────────────┘
See example screenshot below:
Note:
- ALL subfields appear in BOTH layouts – the table shows all columns, the cards show all fields
- The only difference is the presentation format (grid vs stacked), not which data is shown
- Subfields without special configuration (Age, Favorite Meal) show their raw values
- Subfields with configuration (Nationality, Clubs, Trophies) show processed/formatted values
Important: If you want Age or Favorite Meal to also be humanized (if they contain underscores or hyphens), you would add them to the configuration:
{footballer|nationality:glossary|55,clubs:options,trophies:options,age:options,favorite_meal:options}This would humanize all applicable fields while still displaying ALL fields in both layouts.
Screenshots showing practical repeater field with subfields that use glossary and manual options examples: #
Repeater Field Example in JetFormBuilder form #
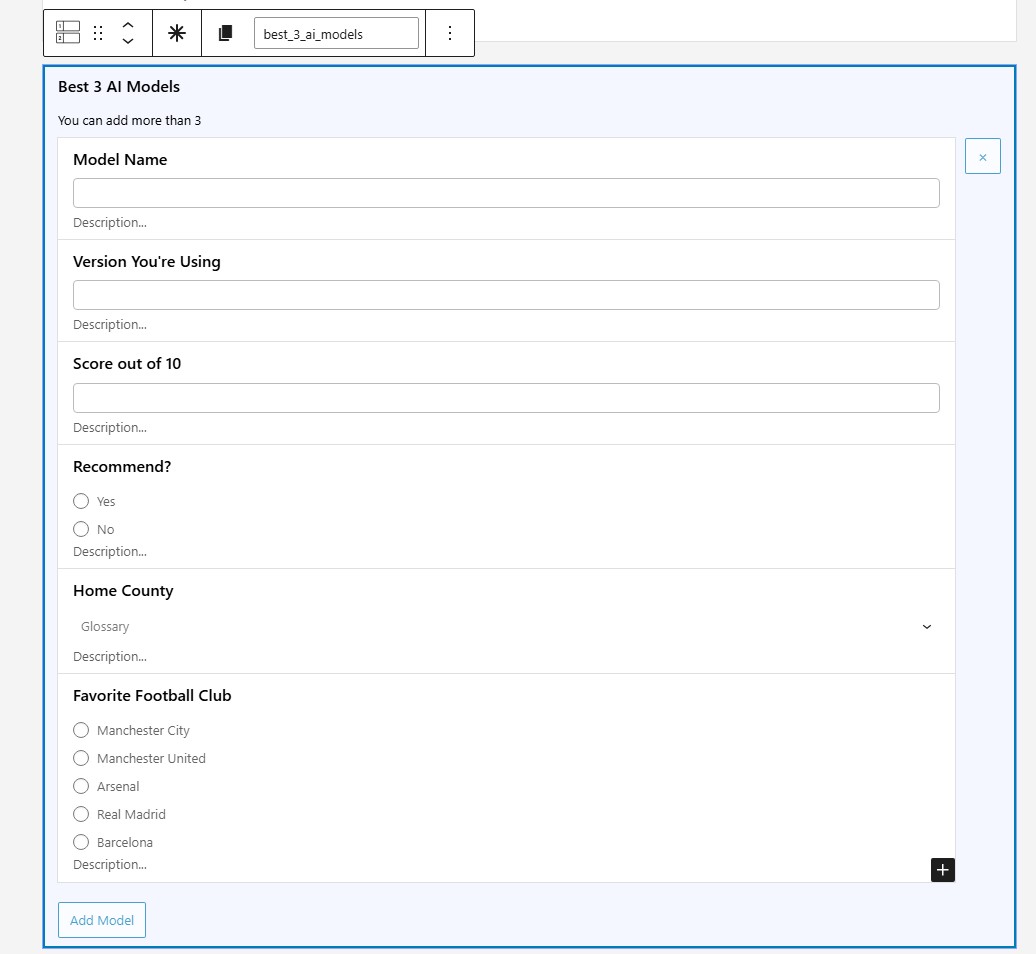
Repeater field that has subfields with options configuration in Nelx JFB Email Template content #
Example screenshot repeater field table output on desktop #
Example screenshot repeater field cards output on mobile #
Putting It All Together – Examples #
Example 1: Simple Welcome Email
Subject: Welcome to our community, {recipient:first-name}!
Hello {recipient:first-name},
Thank you for joining our community. We’re excited to have you!
Best regards,
The Team
Example 2: Post Submission Confirmation
Subject: Your post has been published!
Hi {recipient:first-name},
Great news! Your post “{post_title:inserted}” has been published and is now live.
You can view it here: {post_url:inserted}
Post ID: {post_id:inserted}
Thanks for your contribution!
Example 3: Smart Recipient Ticket Reply
Subject: Re: Support Ticket #{post_id:inserted}
Hello {recipient:name},
{currentuser:displayname} has replied to the ticket: {ticket_title}
{reply_message}
[button:{post_url:inserted}]View Ticket[/button]
Example 4: Event Registration with Current User
Subject: Event Confirmation for {currentuser:first-name}
Dear {currentuser:first-name},
Thank you for registering for our {event_type:term} event on {event_date:date} at {event_time:time}.
Your registration details:
- Event: {event_type:term}
- Date: {event_date:date}
- Time: {event_time:time}
- Registered by: {currentuser:displayname}
Example 5: Company Registration (Using Glossary) #
Subject: Registration Confirmation – {company_name}
Content:
Hello {contact_person},

Thank you for registering your company with us.

Registration Details:
Company Name: {company_name}
Company Type: {company_type:glossary|84}
Business Sector: {business_sector:glossary|92}
Registration Number: {registration_number}

[button:{dashboard_url}]Access Your Dashboard[/button]

Best regards,
Registration Team
Note: {company_type:glossary|84} displays "Private Limited" instead of "private_limited", and {business_sector:glossary|92} displays "Information Technology" instead of "it_services".Example 6: Job Application with Manual Options #
Subject: Application Received – {position} Position
Content:
Dear {applicant_name},

Thank you for applying for the {position:options} position.

Your application details:
Position: {position:options}
Experience Level: {experience_level:options}
Preferred Location: {location:options}

We will review your application and contact you soon.

Best regards,
HR Team
Example 7: Order Confirmation with Repeater Field #
Subject: Order Confirmation – #{order_number}
Content:
Dear {customer_name},

Thank you for your order! Here are your order details:

{order_items|product_type:glossary|45,shipping_method:options}

Total Amount: {order_total}
Shipping Address: {shipping_address}

[button:{order_tracking_url}]Track Your Order[/button]

We'll notify you once your items ship.

Best regards,
Customer Support Team
Note: The {order_items} repeater includes sub-field processing:
product_type– Uses glossary ID 45 (displays “Electronics” instead of “elec”)shipping_method– Humanizes manual options (displays “Express Shipping” instead of “express_shipping”)- Other sub-fields (quantity, price) show raw values
Example 8: Using Post Meta
Subject: Task #{post_id:inserted} has been assigned to you
Hello {recipient:first-name},
A new task has been assigned to you by {currentuser:displayname}.
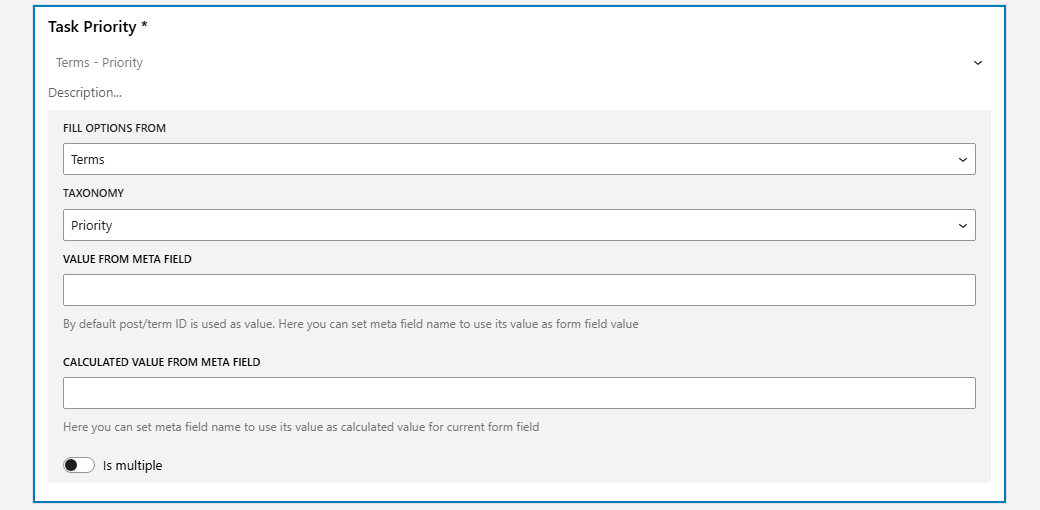
Task Priority: {task_priority:term}
[button:{post_url:inserted}]View Task[/button]
Using Button Macros #
Button macros create clickable buttons in your emails:
Basic Button
Click here to view your post: [button:{post_url:inserted}]View Post[/button]
You can also add a static link like this:
[button:https://example.com/blog/post/]View Post[/button]Personalized Button
[button:{user_profile_url}]Visit {recipient:first-name}’s Profile[/button]
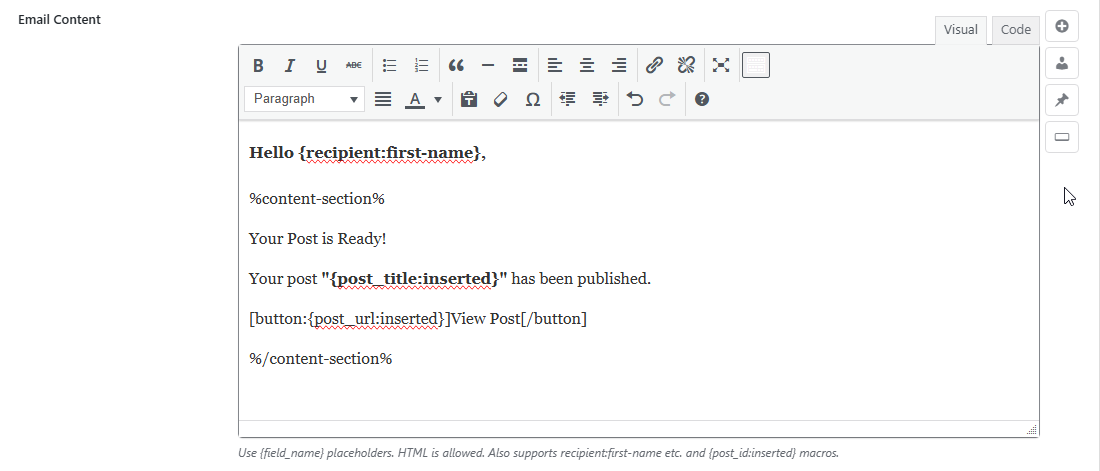
Combining with Section Styling
If you have section styles (see Step 9 below), wrap content with them:
Hello {recipient:first-name},

%content-section%

Your Post is Ready!

Your post "{post_title:inserted}" has been published.

[button:{post_url:inserted}]View Post[/button]

%/content-section%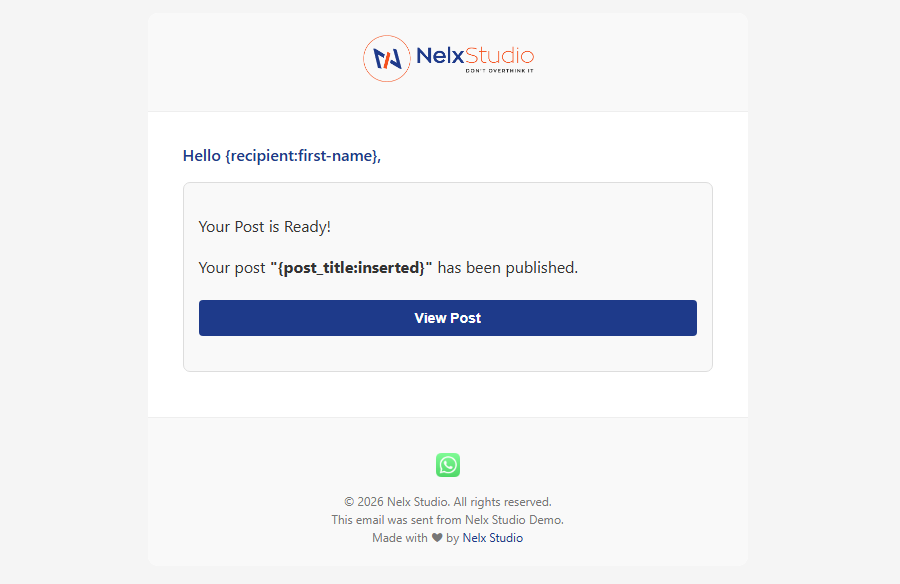
Using the Insert Buttons #
Next to each field, you’ll see small buttons with searchable dropdowns:
| Icon | Name | Where to use it |
|---|---|---|
| Insert Form Field | Anywhere – inserts {field_name} placeholders | |
| Recipient Placeholders | Subject line and email content – inserts recipient:first-name, smartrecipient:name, etc. | |
| Current User Placeholders | Subject line and email content – inserts currentuser:first-name, etc. | |
| Post Data | Subject line and email content – inserts {post_id:inserted}, {post_title:inserted}, {post_url:inserted} | |
| Button Macro | Email content only – inserts complete button code |
Click any button to open a scrollable, searchable dropdown of available options.
Quick Reference Card #
| Field Type | Placeholder Syntax | Example |
|---|---|---|
| Regular field | {field_name} | {first_name} |
| Glossary options | {field_name:glossary|id} | {company_type:glossary|84} |
| Manual options | {field_name:options} | {position:options} |
| Term label | {field_name:term} | {category:term} |
| Date formatting | {field_name:date} | {submission_date:date} |
| Time formatting | {field_name:time} | {start_time:time} |
| Datetime formatting | {field_name:datetime} | {created_at:datetime} |
| Post meta | {post_meta:key} | {post_meta:assigned_to} |
| Repeater (simple) | {repeater_name} | {order_items} |
| Repeater (with config) | {repeater|config} | {order_items|product_type:glossary|45,status:options} |
| Recipient data | recipient:field | recipient:first-name |
| Current user data | currentuser:field | currentuser:displayname |
| System data | {placeholder} | {site_name} |
Pro Tip: For select, radio, and checkbox fields, always use glossary placeholders ({field:glossary|id}) whenever possible. This gives you complete control over what appears in your emails and ensures professional, readable content. For manual options, use the options placeholder ({field:options}) to automatically humanize values while preserving acronyms like CEO, CFO, API, PDF, etc.
Step 8: File Attachments #
Attach files that users upload in your form:
- Select a form first (Step 1).
- Click the attachment dropdown and choose a file upload field from your form.
- Click “Add Attachment”.
- Repeat to add multiple attachments.
Each attachment appears as a tag. Remove any attachment by clicking the trash icon.
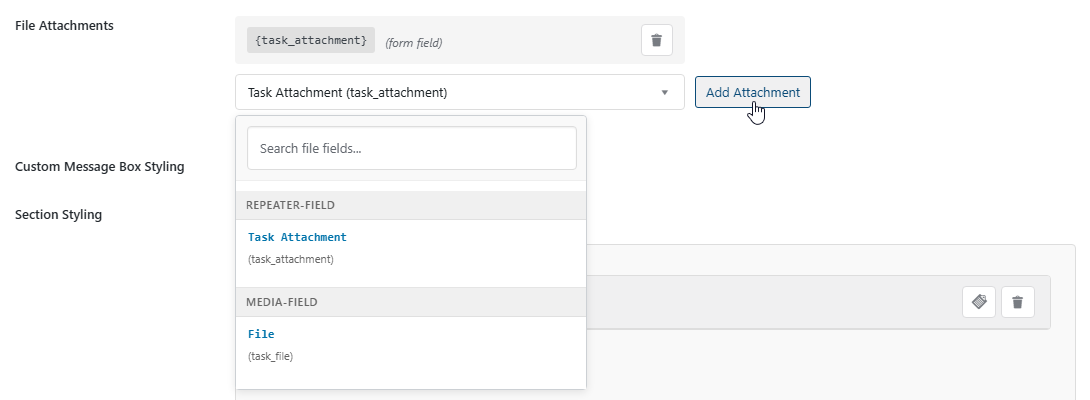
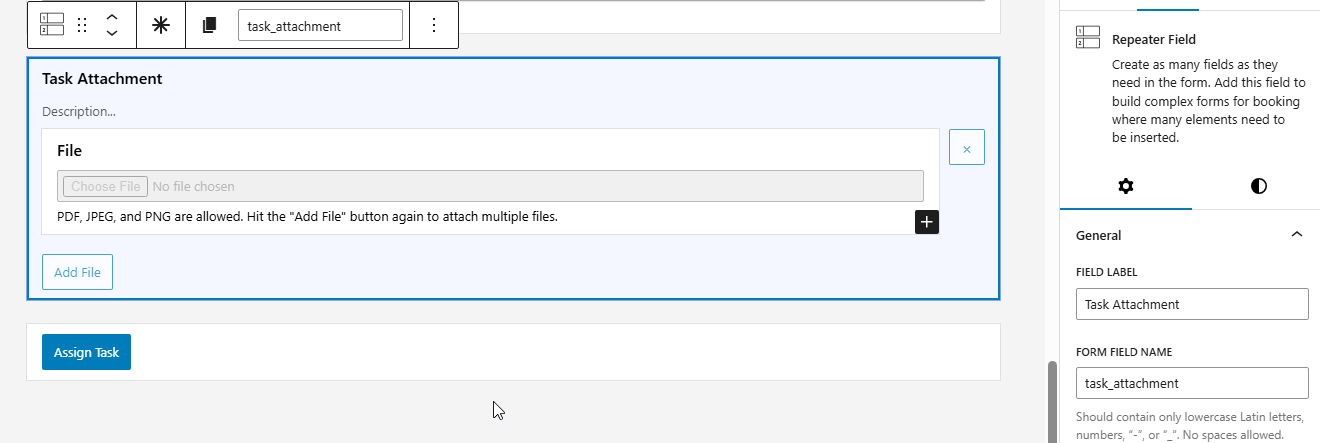
Important Note:
- If your media field is inside a repeater field, use the repeater key and not the media field itself. In the screenshot above, we added {task_attachment} as the attachment field and not {task_file} (which is the actual media field) because the media field is within the repeater. See the actual form setup field screenshot below for that field.
- When using the Nelx Secure Docs plugin, original filenames are preserved in email attachments.
Step 9: Custom Message Box Styling #
This feature lets you create styled boxes in your emails for highlighting important information, warnings, or success messages.
Turn on “Override global message box styling” to customize.
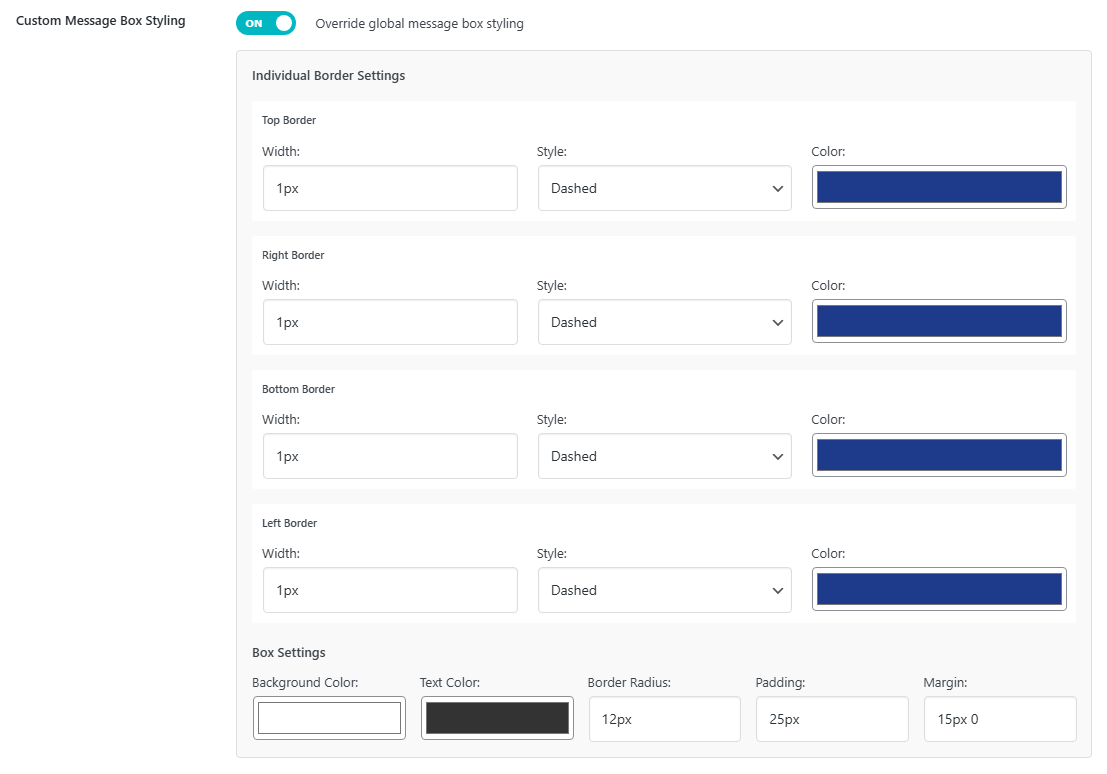
Individual Border Settings (per side) #
- Width (Top, Right, Bottom, Left)
- Style (Solid, Dashed, Dotted, Double, Groove, Ridge, Inset, Outset)
- Color
Box Settings #
- Background Color
- Text Color
- Border Radius
- Padding
- Margin
Note: These styles apply to this specific template only, overriding global settings. Below is a preview from the settings above.

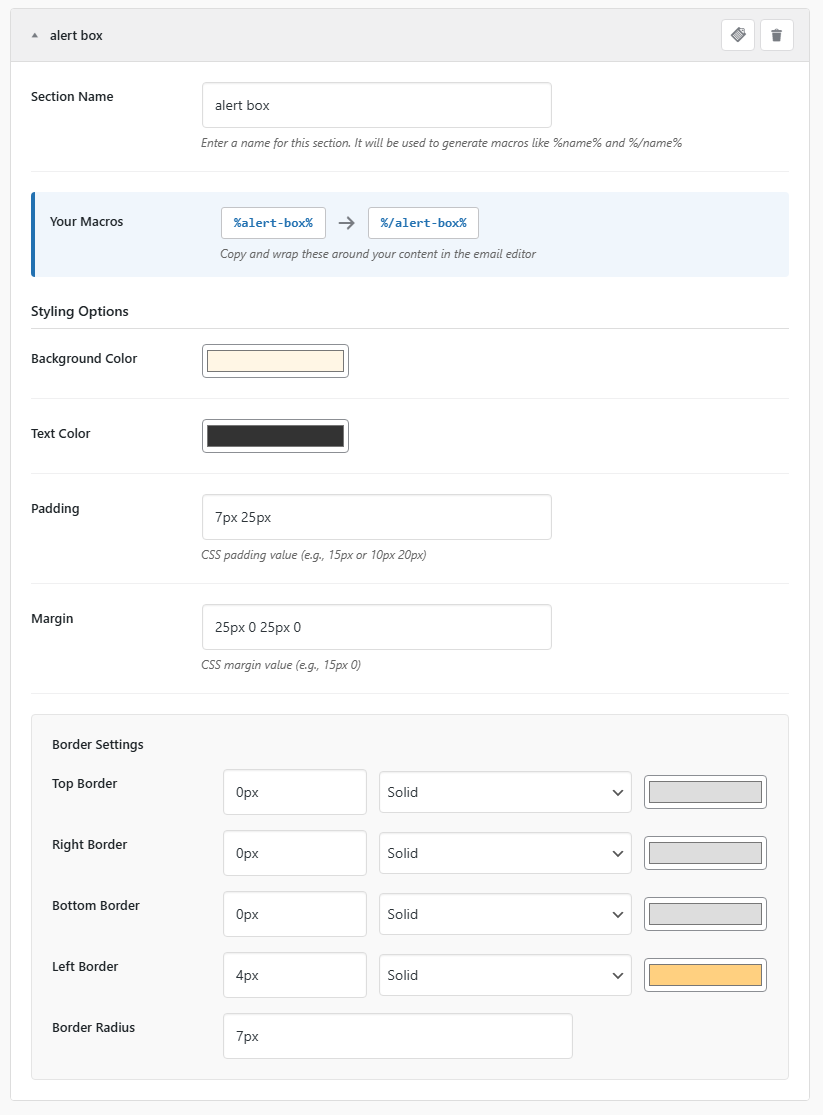
Step 10: Section Styling (Template-Specific) #
Section Styling lets you create custom-styled sections within this specific email template.
Turn on “Enable section styling with macros” and click “Add Section Styling”.

How to Use Section Styling #
- Name your section (e.g., “Alert Box”, “Success Message”).
- Set the styles (borders, background, padding, etc.).
- Use the generated macro (e.g., %alert-box% your content %/alert-box%).
Paste the macro in your content editor, and separate them each in paragraph like below:
Hello {recipient:first-name},

%content-section%

Your Post is Ready!

Your post "{post_title:inserted}" has been published.

[button:{post_url:inserted}]View Post[/button]

%/content-section%

%alert-box%

⚠️ Important: Published posts are subject to later reviews and you might be asked to make adjustments.

%/alert-box%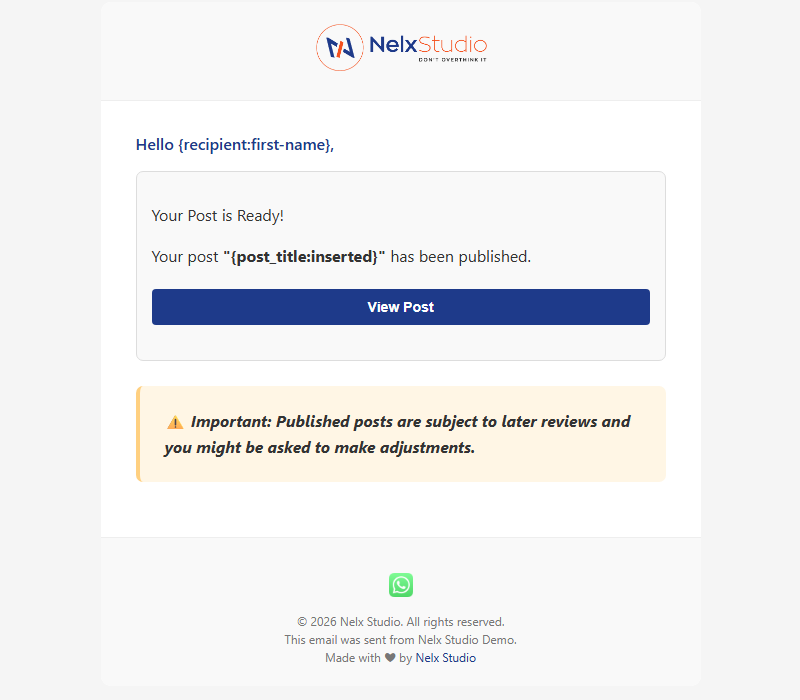
Note: These sections only work within the template where you created them. For best results, each styling macro wrapper should be put on independent paragraph.
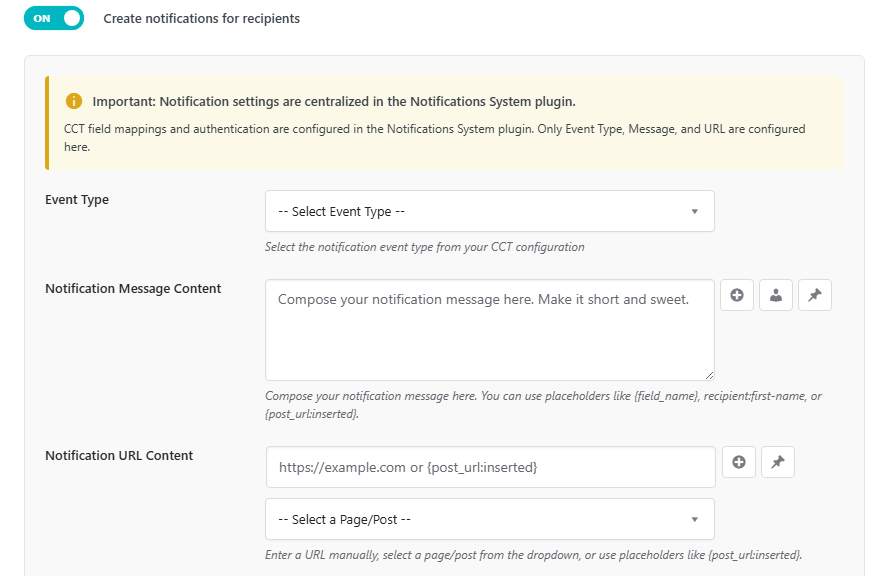
Step 11: Notification Settings (Create In-App Notifications) #
NOTE: This option is only available if you have the notification plugin active.
Toggle on “Create notifications for recipients” to automatically create in-app notifications in your JetEngine CCT whenever an email is sent.
Prerequisites #
- The Nelx Notification System plugin must be installed and activated.
- You must configure your global CCT settings in the Notification System plugin (CCT slug, field mappings, and authentication).
- If the system is not configured, you will see a notice with a link to complete the setup.
How Notifications Work #
- Emails are sent first, if configured.
- Notifications are then created for the same recipients who received the email.
- The system automatically sets Status = “unseen”, Sound Played = “no”, and Time = current WordPress time.
Important Note About CCT Field Mappings #
The Notification System plugin handles all global CCT field mappings (e.g., Recipient, User Role, Message, URL, Status, Sound Played). You only need to configure the following items within this email template:
Template-Specific Configuration #
| Field | Description | Example |
|---|---|---|
| Event Type | The specific event value to store. Can be a static value or use placeholders. Select from your CCT’s radio field options or enter manually. | Task, Comment, Invoice, Ticket, etc. |
| Notification Message Content | The message text (supports placeholders). | A new task "{post_title:inserted}" has been assigned to you. |
| Notification URL Content | The URL for the notification. Select a page/post from the dropdown or enter manually with placeholders. | {post_url:inserted} or https://example.com/task/{task_id} |
Using Placeholders in Notifications #
You can use all standard placeholders for the Message and URL fields, including:
- Form fields:
{task_title}, {assigned_by} - Recipient placeholders:
recipient:first-name, recipient:name - Current user placeholders:
currentuser:displayname - Post data:
{post_title:inserted}, {post_url:inserted}
How Recipients Are Determined for Notifications #
- Smart Recipient — If enabled, the notification goes to the determined user (post author, assignee, or third party).
- Conditional Recipients — If a condition matches and has notifications enabled, its settings override the main template.
- Standard Recipients — Based on your recipient type (User ID, User Roles, or Standard emails).
Step 12: Activate Your Template #
At the bottom of the template, you’ll see a toggle switch:
- ON (cyan) — This email will be sent when the form is submitted.
- OFF (gray) — This email will not be sent (useful for templates you are still working on).

Managing Your Templates #
Expand/Collapse Templates #
- Click the arrow at the top of any template to expand or collapse it.
- Only one template can be expanded at a time (accordion behavior).
Duplicate a Template #
Click the “pages” icon next to any template to create an exact copy.
Preview an Email #
Click the “eye” icon to preview how your email will look (opens in a new window).
Delete a Template #
Click the trash icon and confirm to remove a template you no longer need.

Quick Reference: Where to Use What #
| Feature | Where it works | Example |
|---|---|---|
Form fields {field_name} | Anywhere | {first_name} |
Post meta {post_meta:key} | Anywhere | {post_meta:assigned_staff_id} |
| Recipient placeholders | Subject & Content only | recipient:first-name |
| Smart Recipient placeholder | Subject & Content only | smartrecipient:name |
| Current User placeholders | Subject & Content only | currentuser:displayname |
Post data {post_id:inserted} | Subject & Content only | {post_url:inserted} |
Date formatting :date | Content only (with date fields) | {event_date:date} |
Term labels :term | Content , subject | {category:term} |
| Button macros | Content only | [button:{post_url}]View[/button] |
| Section styling | Content only | %section%...%/section% |
| Notification settings | Creates in-app notifications | Configure Event Type, Message, and URL |


